- Asynchronous → not depend on the system clock
Asynchronous
- Not depend on the system clock → เอา ก่อนหน้าไปเชื่อมกับ Clock ของตัวต่อไป
2-bit Asynchronous Binary Counter
#NotOnTheExam
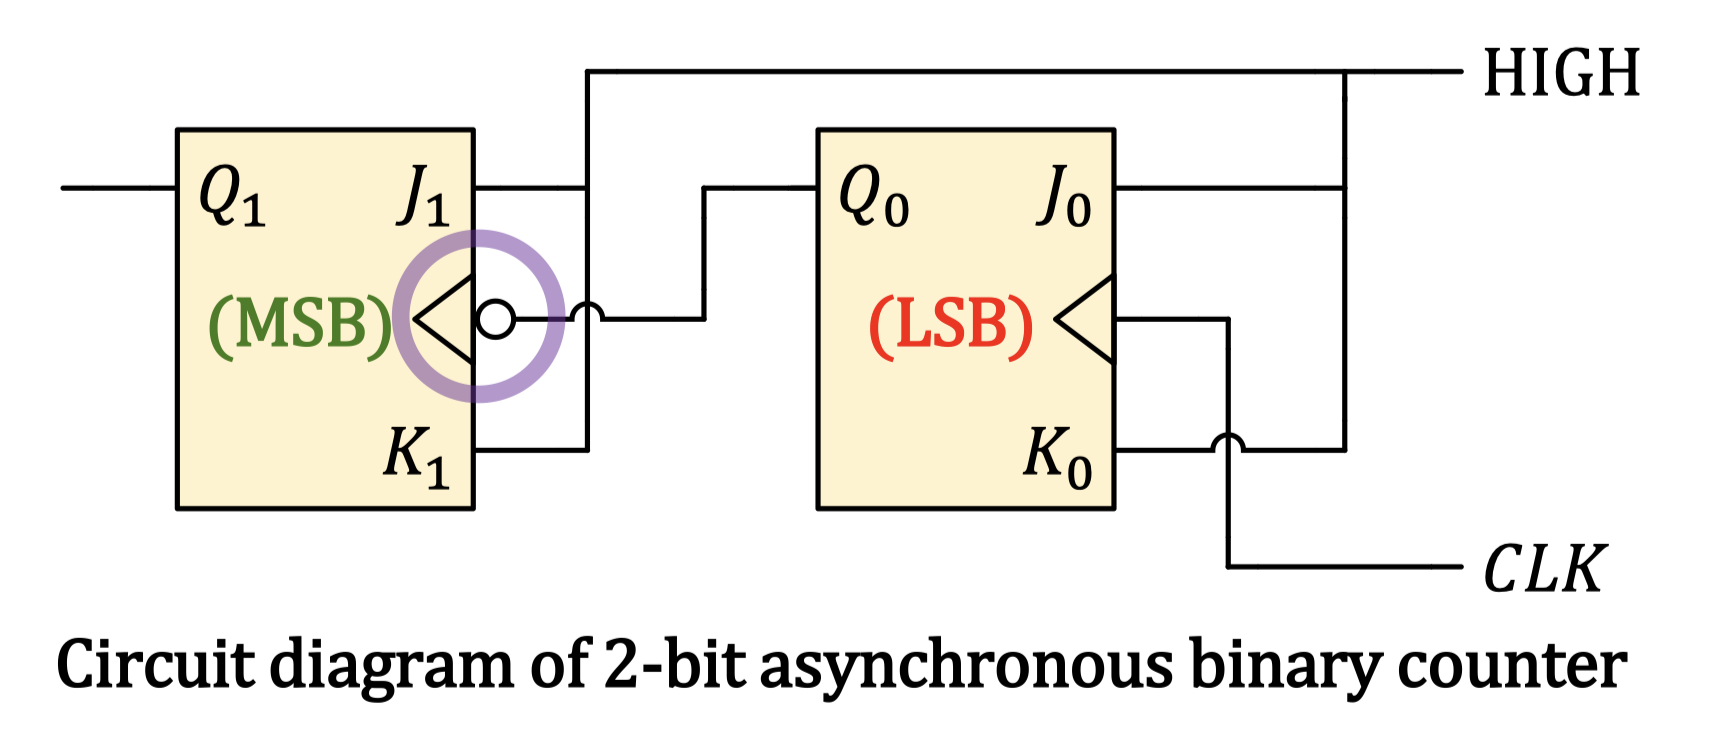
- MSB ที่เข้าตรง Clock มันไม่ใช่ Clock นะ → ถือว่าเป็น Asynchronous
- Excitation variable
- (เพราะว่าต่อกับ High ตลอด)
- LSB เป็น Positive-edge Trigger, MSB เป็น Negative-edge trigger
- What trigger Q1 is the falling edge of Q0 ?? Check
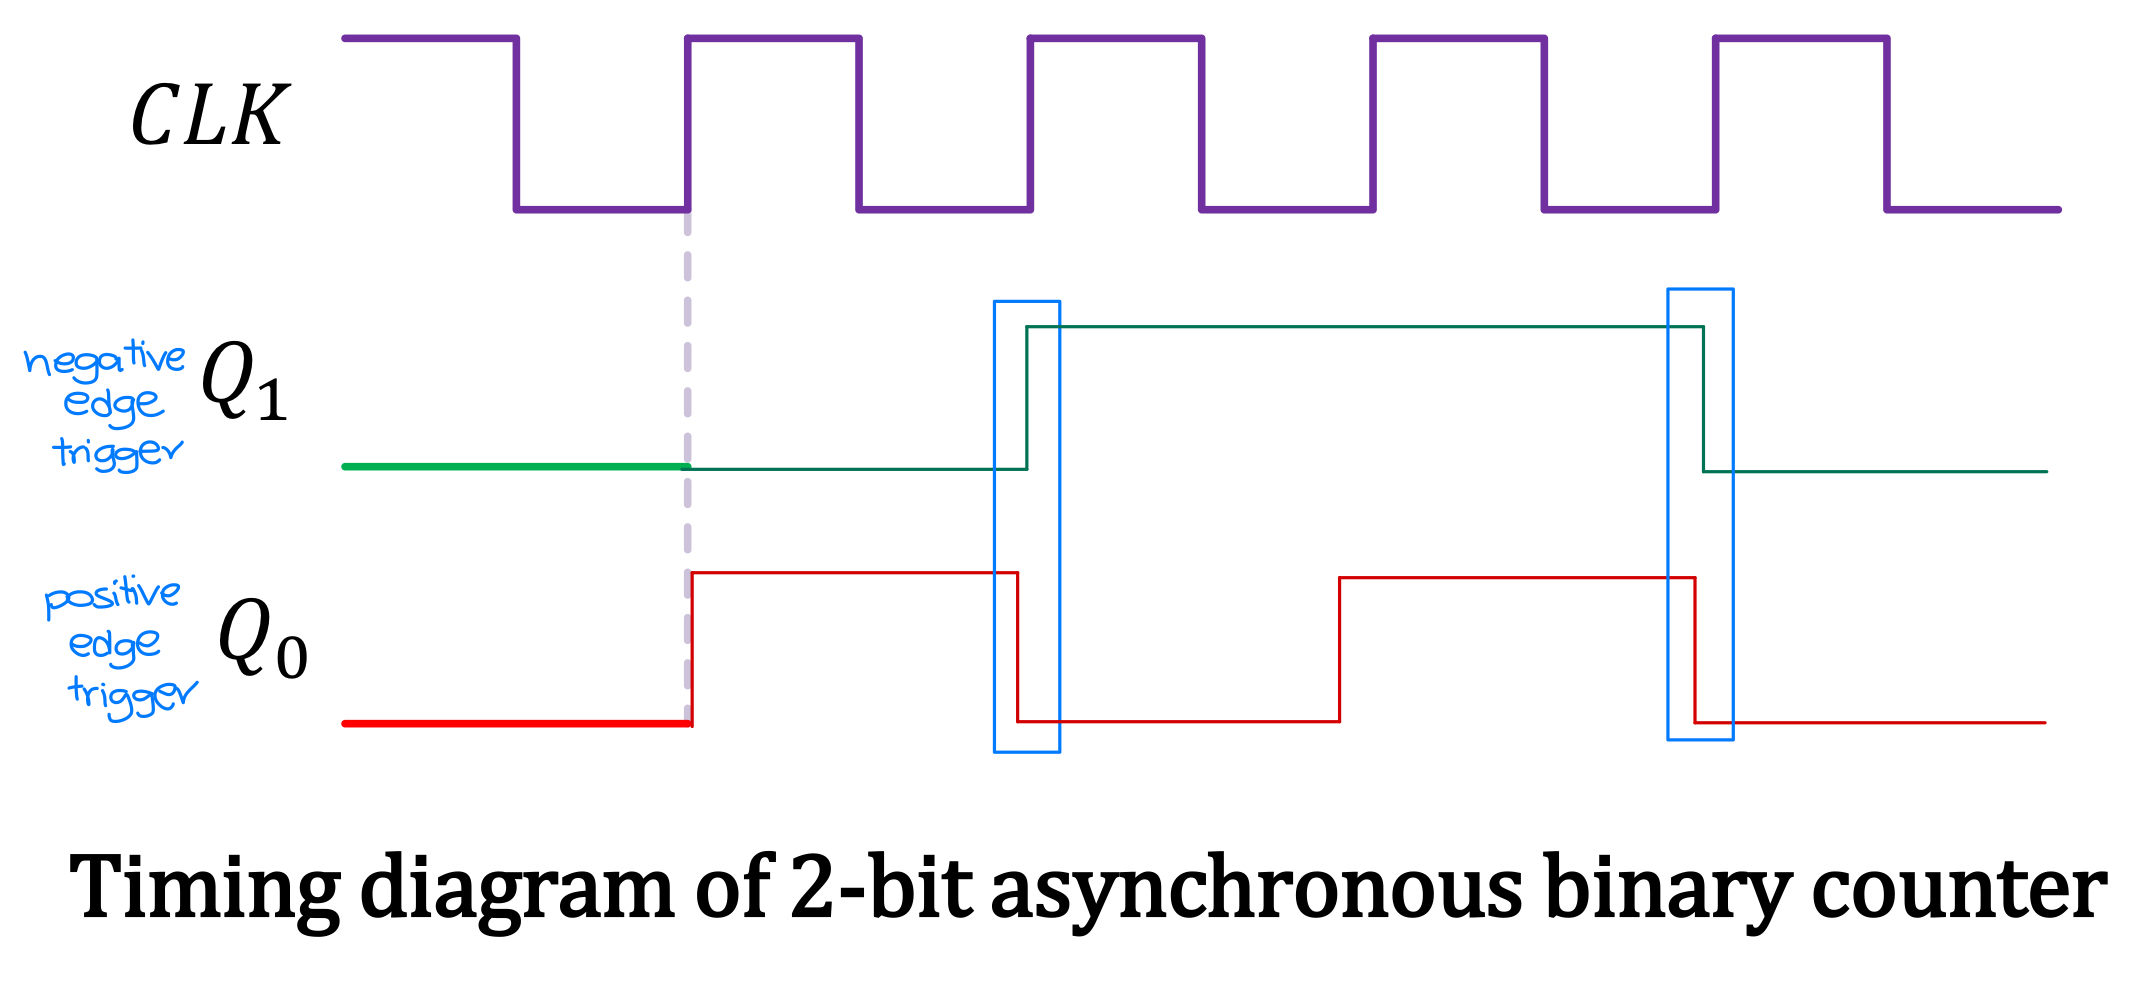
สุดท้ายแล้วโดยสรุปคือมันทำหน้าที่ 2-bit Counter นั่นแหละ
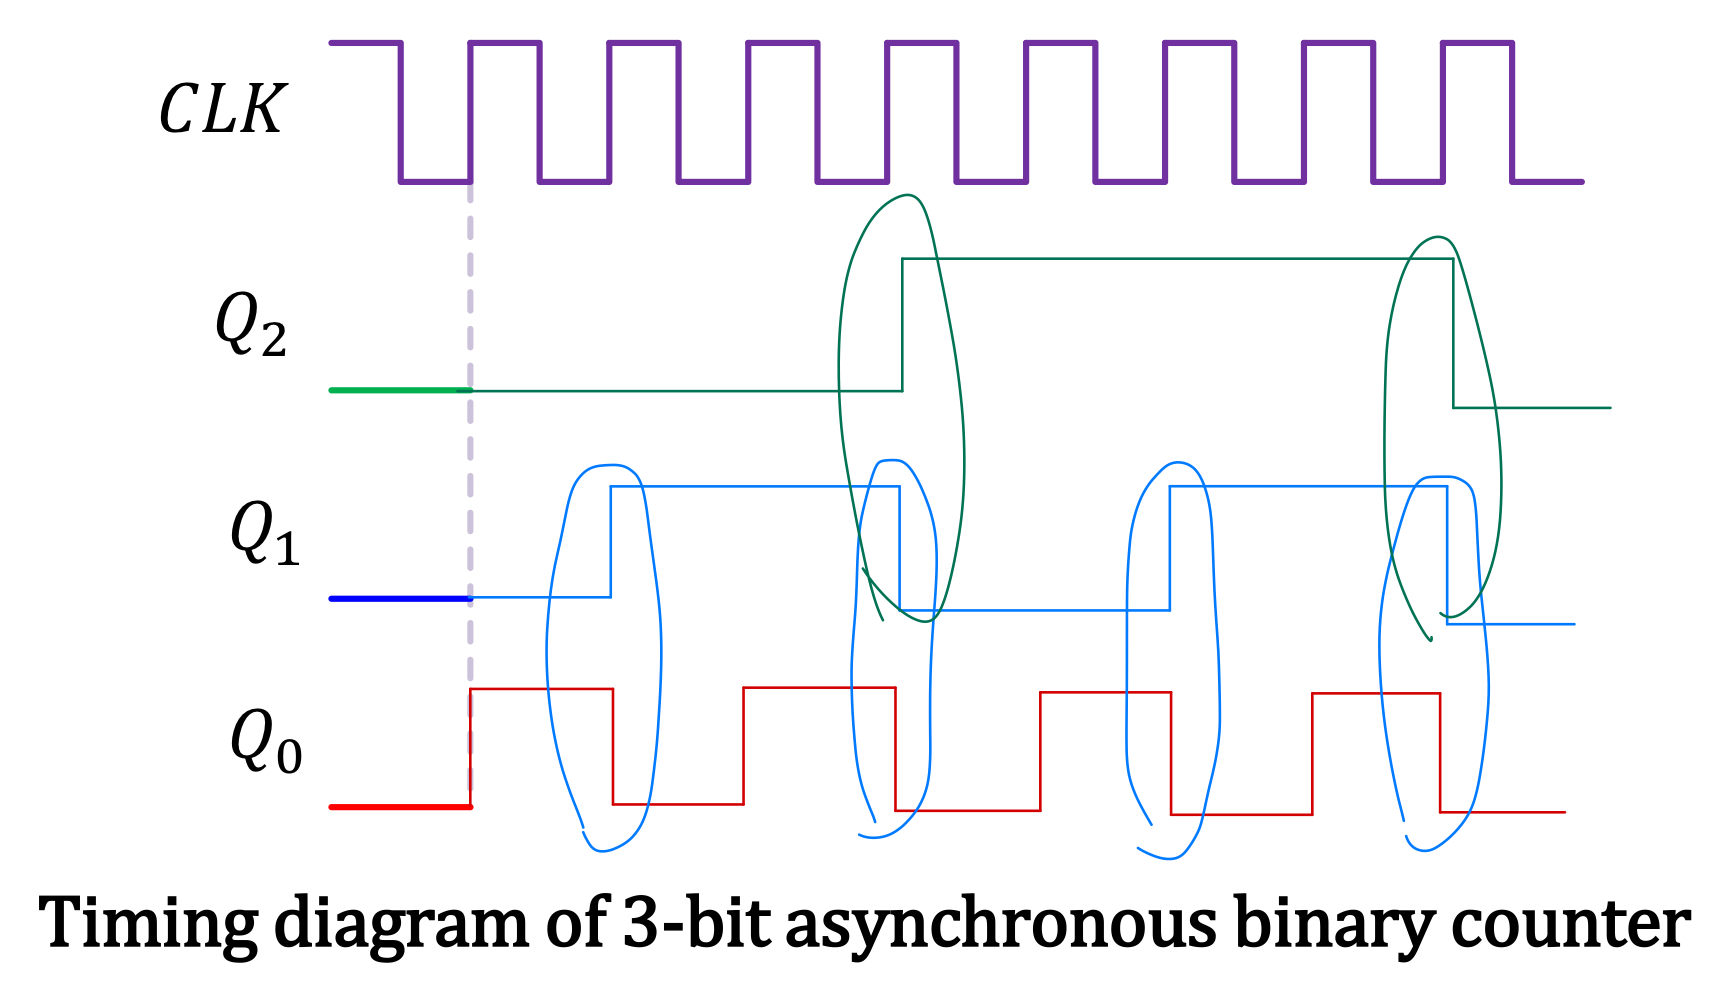
3-bit Asynchronous Binary Counter
#NotOnTheExam
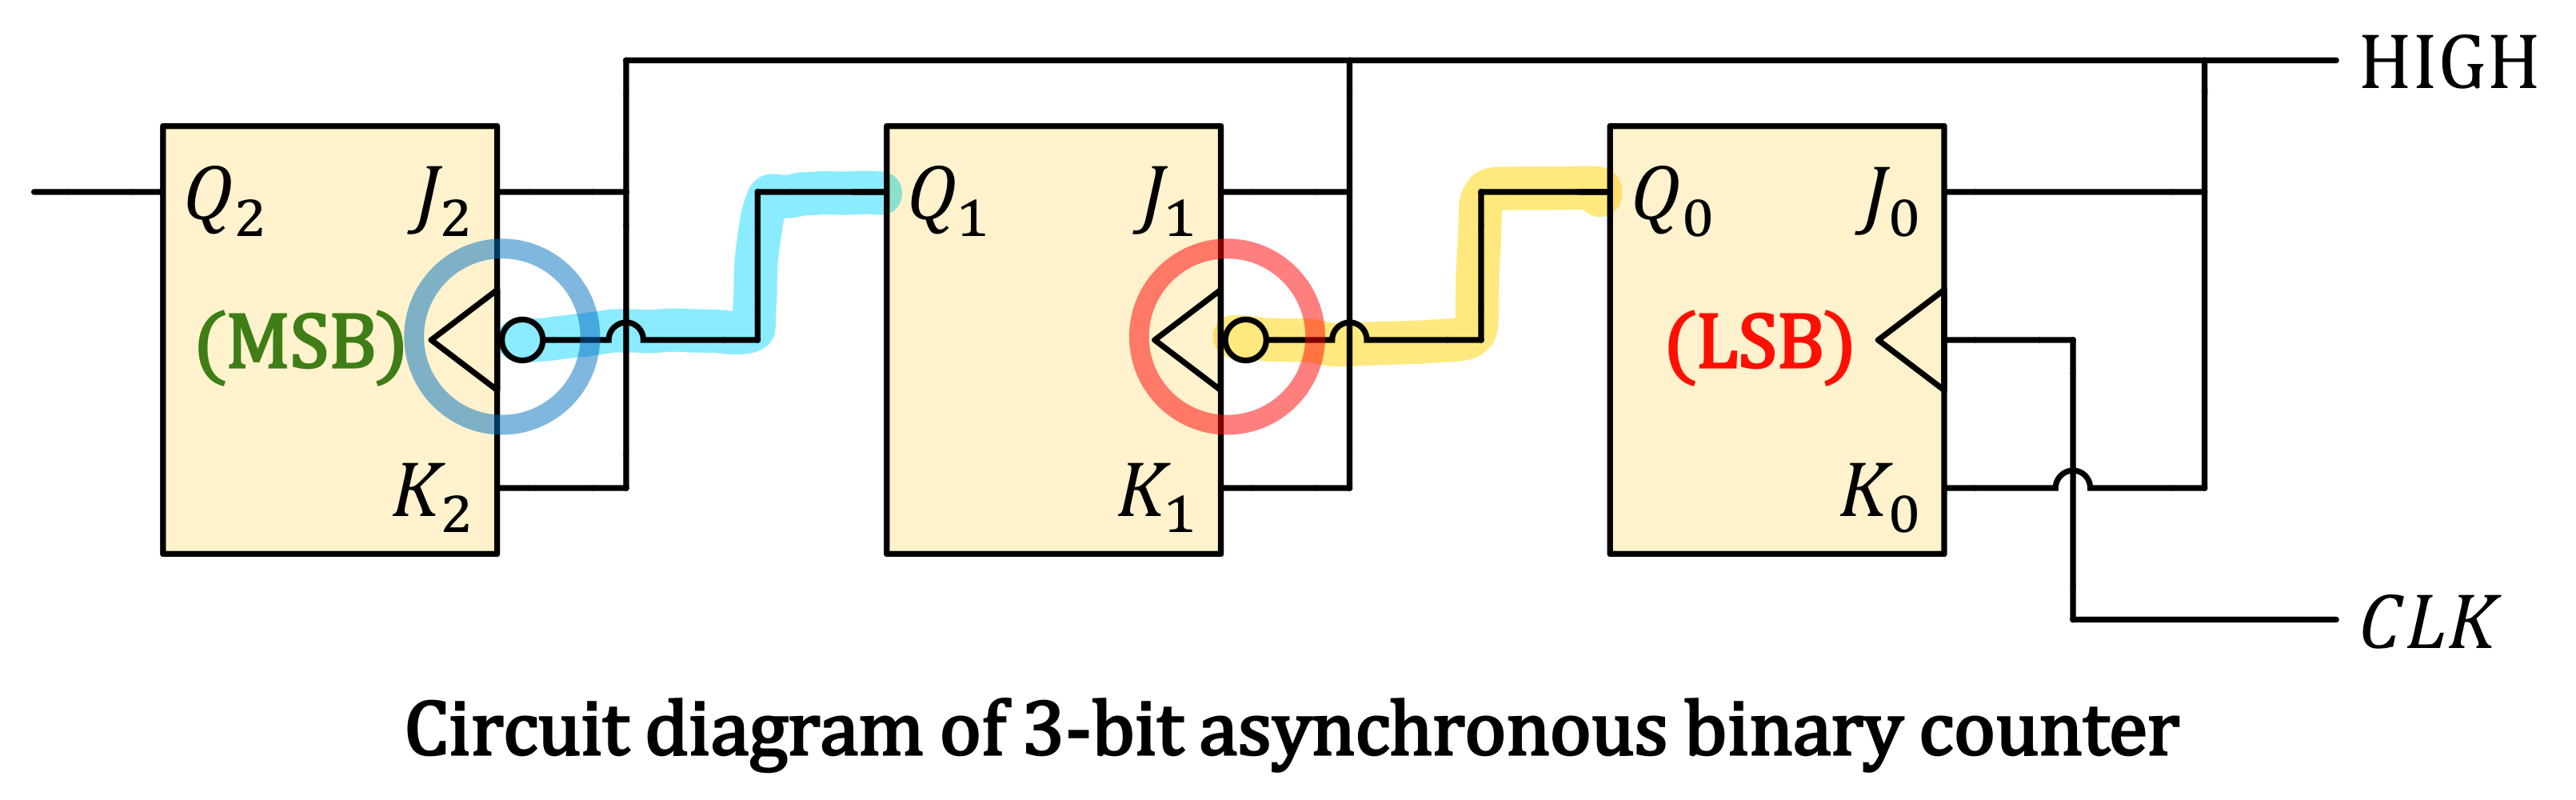
- Excitation variable
Synchronous
- Depend on the system clock → เอาไปเชื่อมกับ Clock ให้หมด
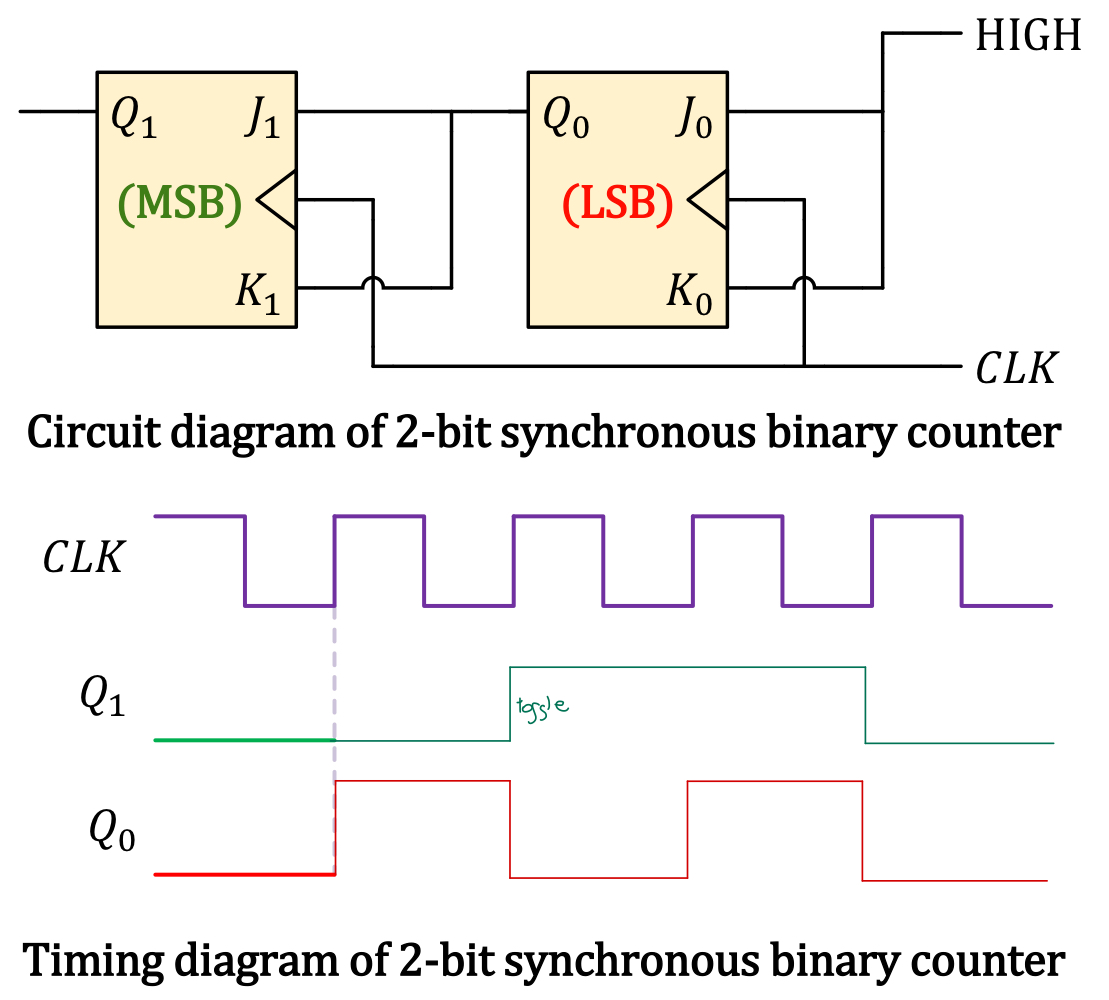
2-bit Synchronous Binary Counter
#NotOnTheExam
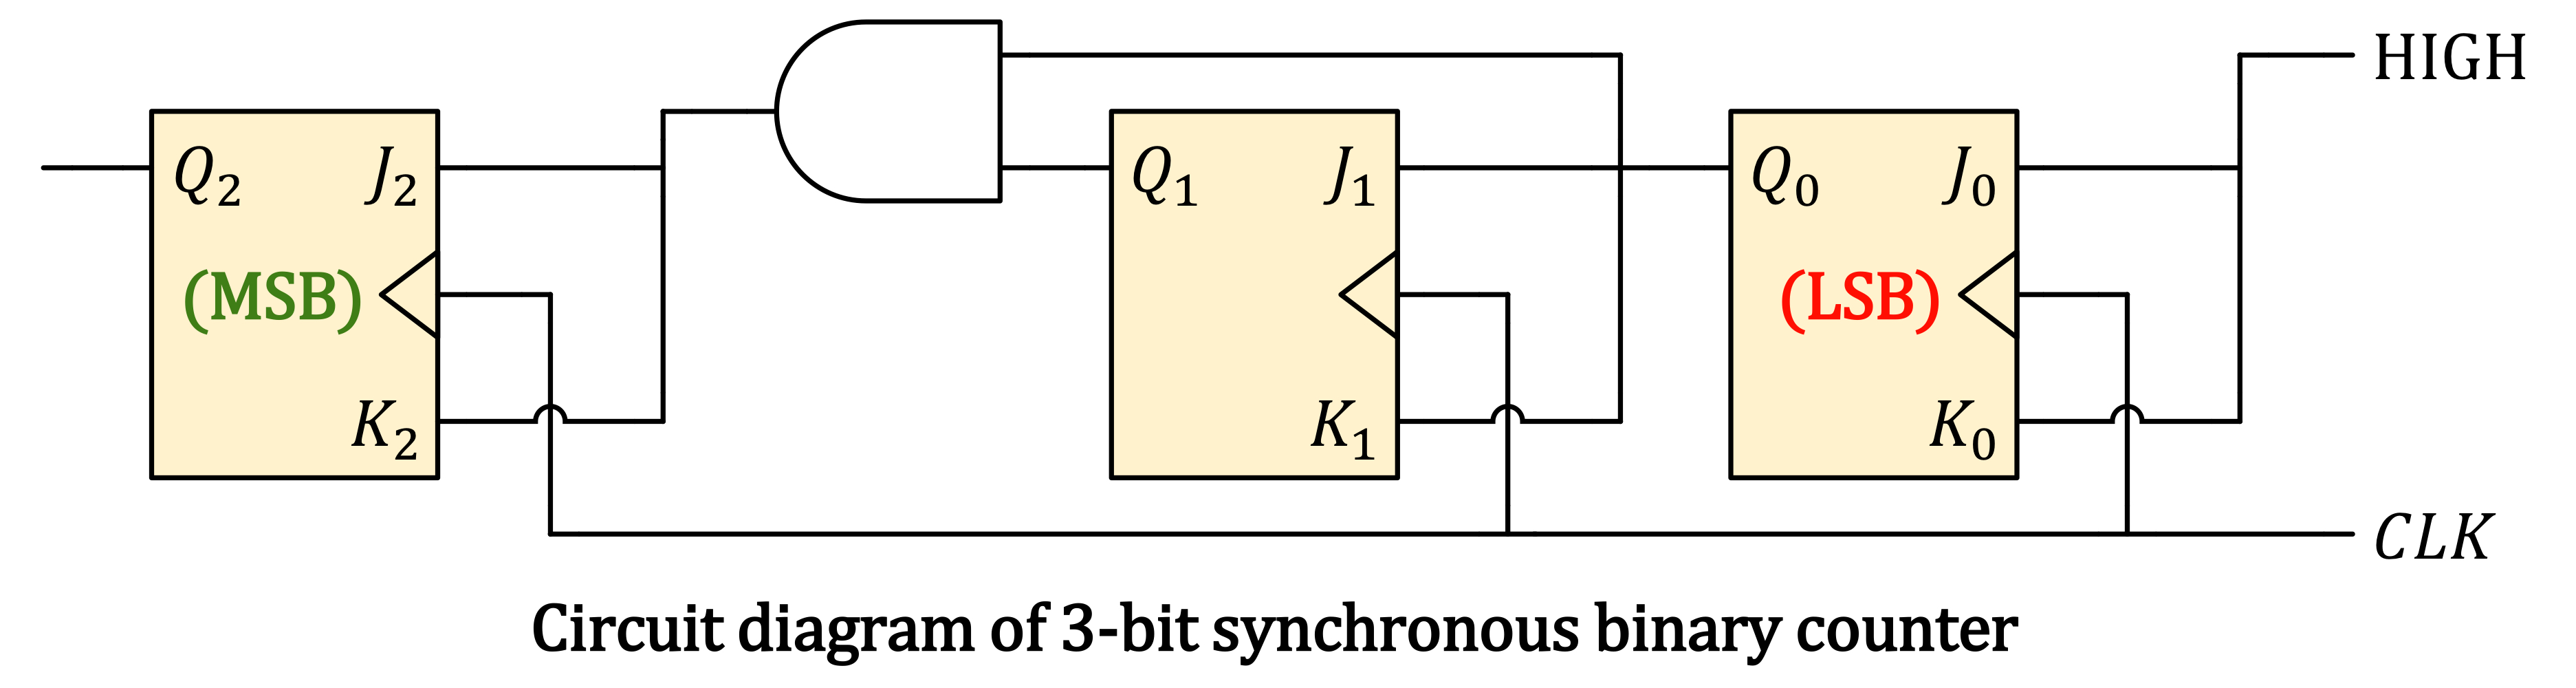
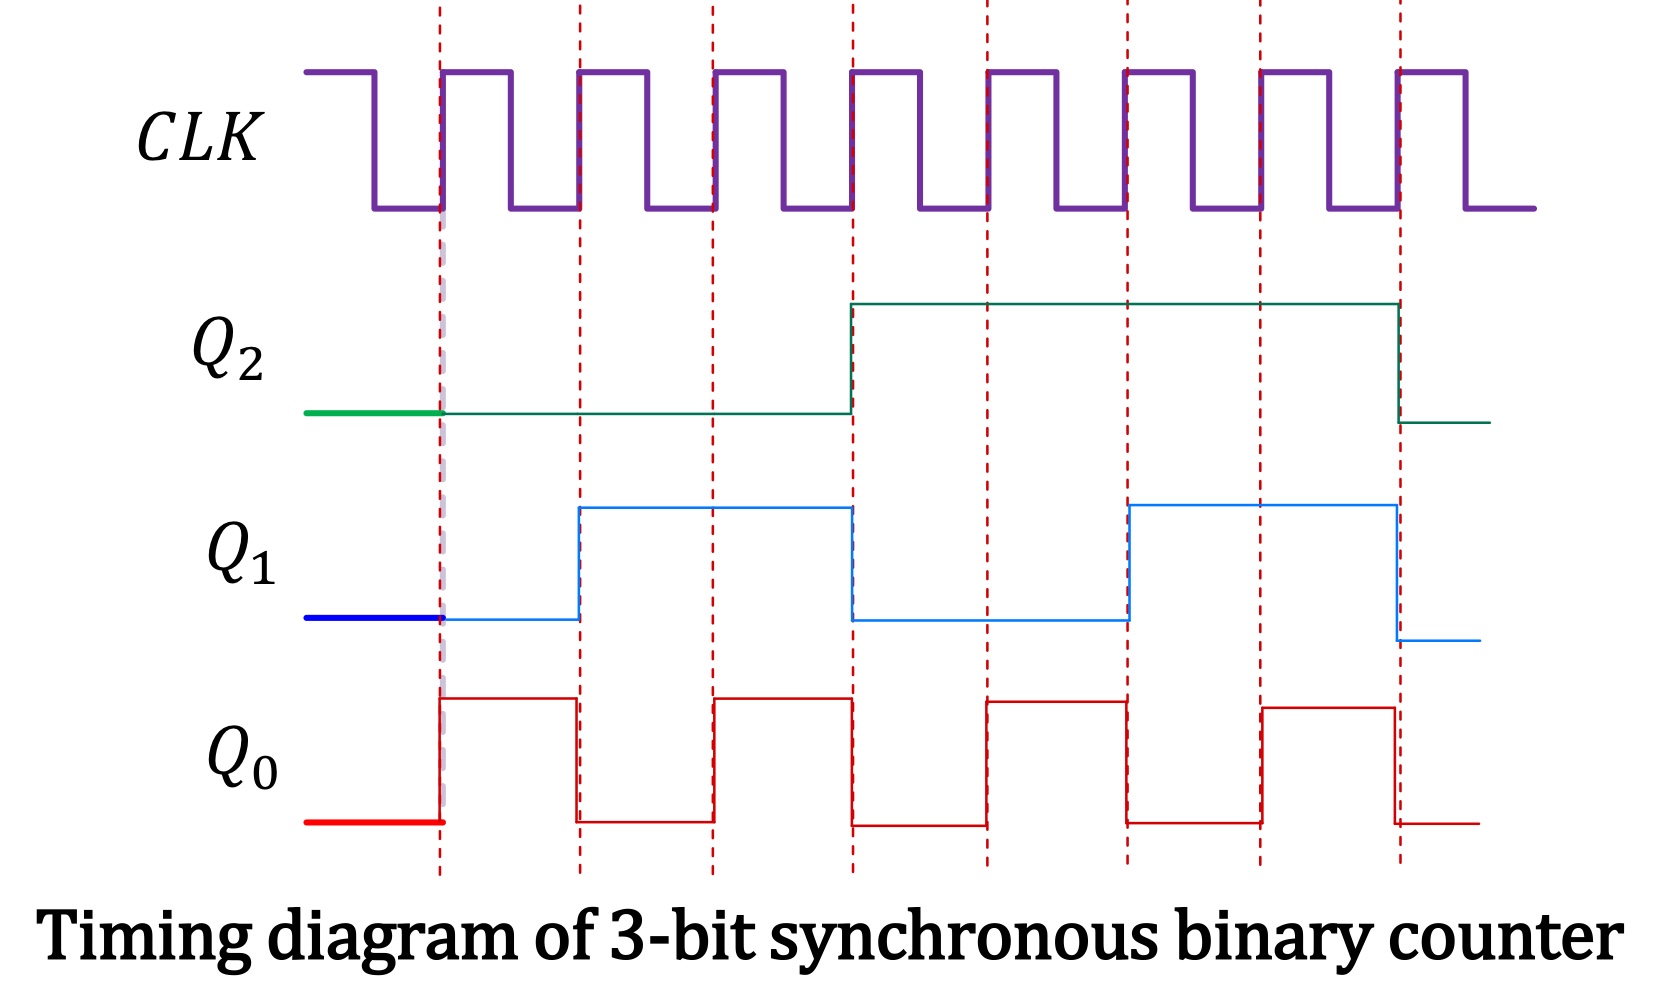
3-bit Synchronous Binary Counter
#NotOnTheExam
SN74161 Synchronous Binary Counter
- A commercially available 4-bit synchronous binary counter is the SN74161 integrated circuit chip manufactured by Texas Instruments.
- The SN74161 has a modulus (number of unique states) or count of 16.
- A higher modulus can be achieved by cascading multiple SN74161 chips.
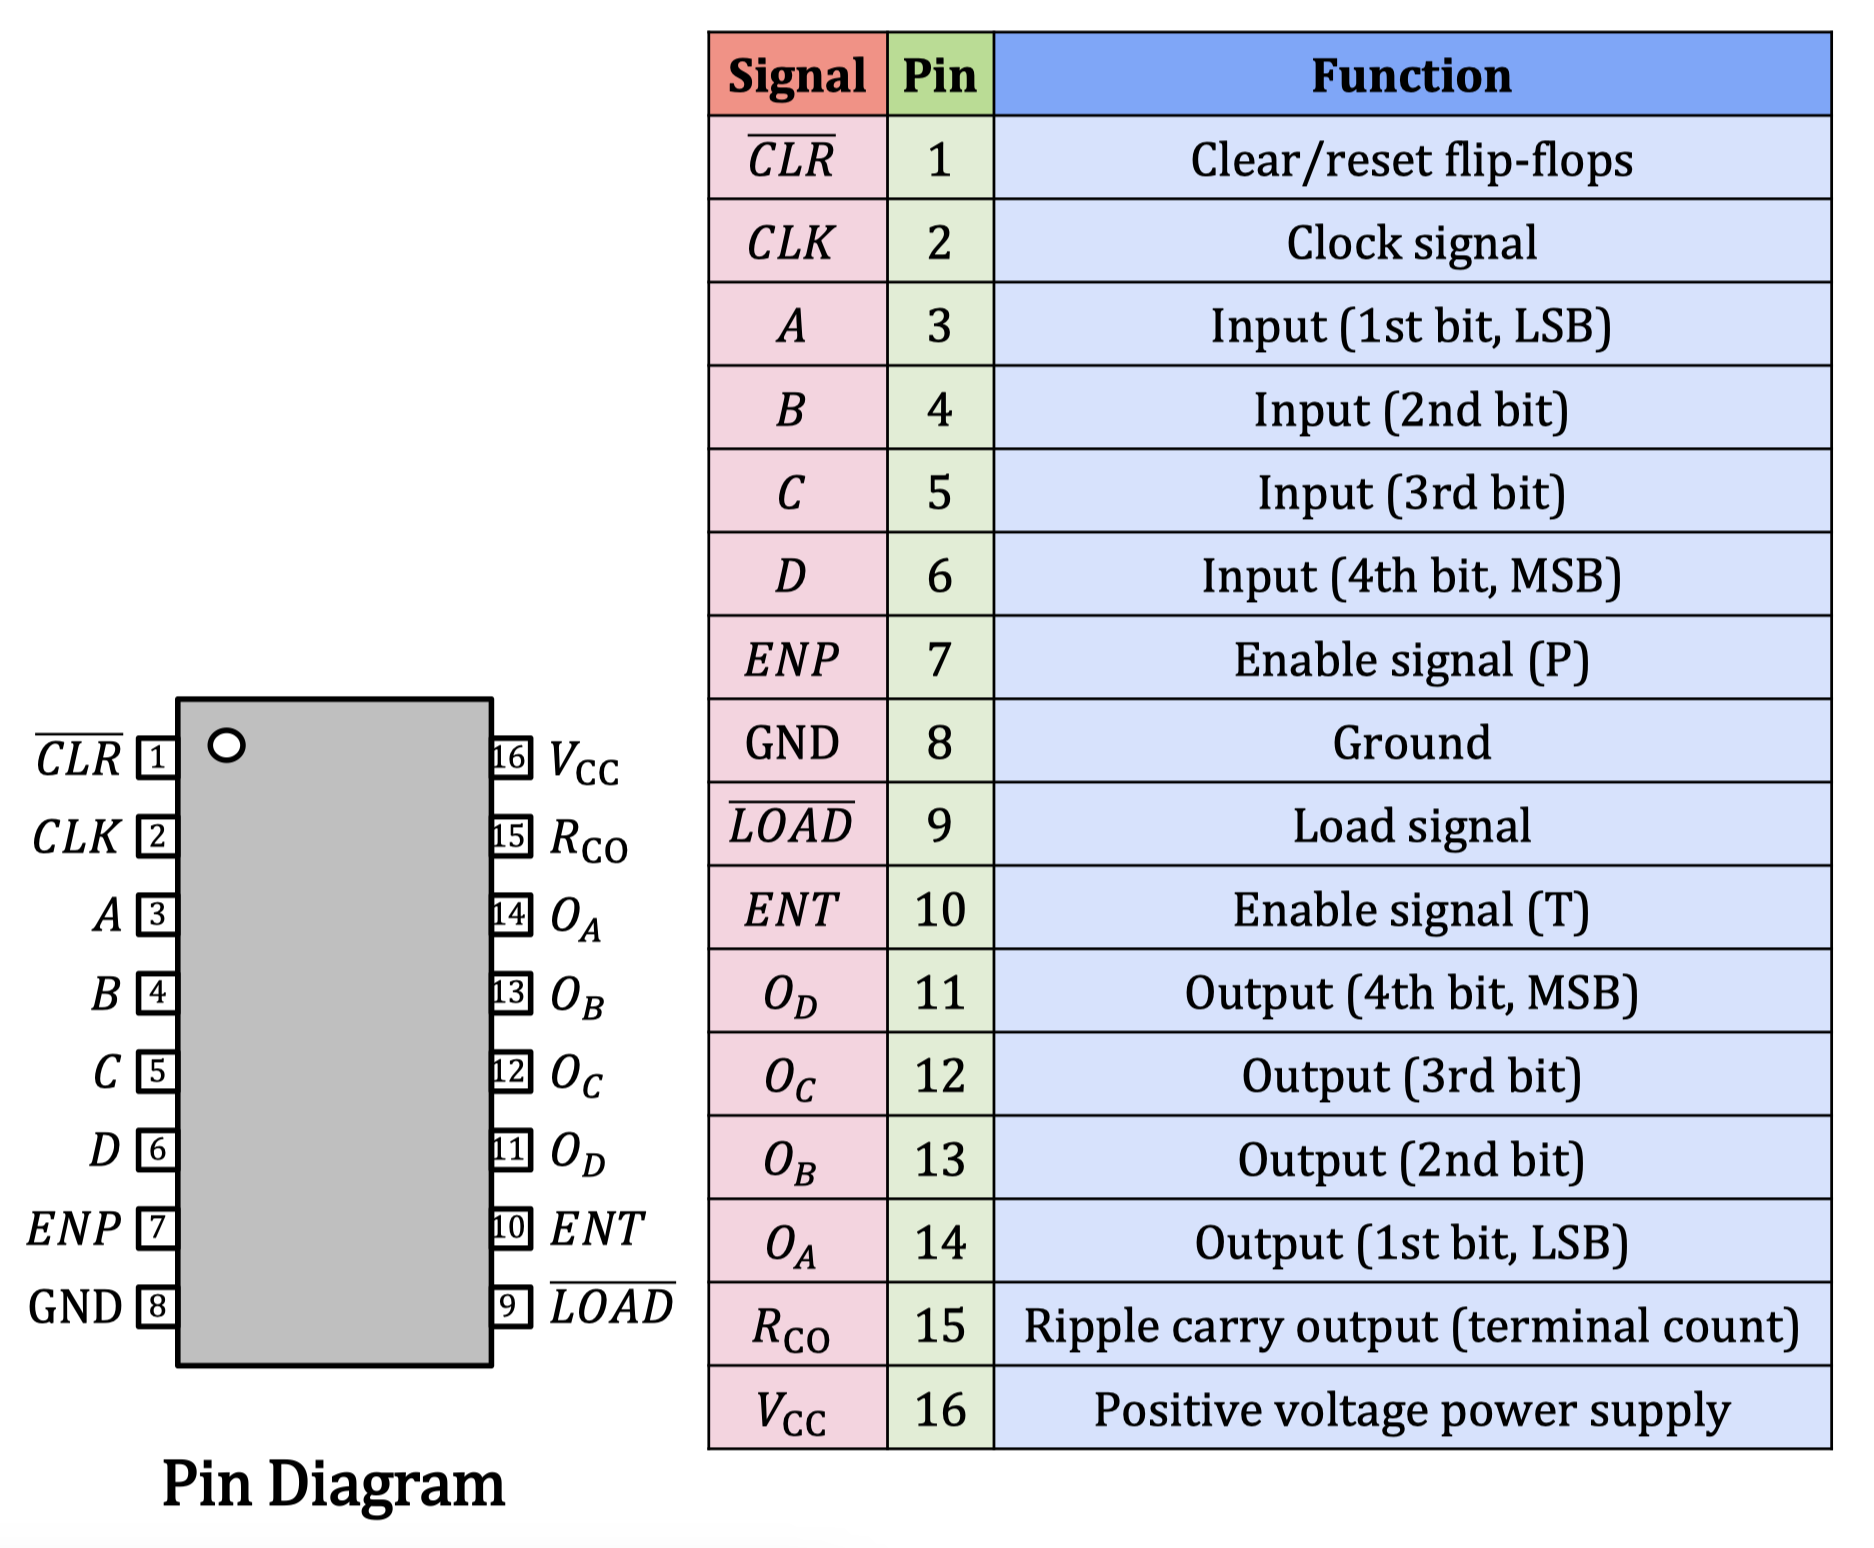
- Pin Informations
- 1 — → Active Low Clear Signal
- ถ้าให้เป็น 0 จะ Clear Flip-flop เป็น 0 ทั้งหมด
- 2 — → เอาไว้เชื่อมต่อกับ System Clock (Oscillator)
- 3-6 — Input → 4 bits (D เป็น MSB และ A เป็น LSB)
- 7, 10 — Enable Signal
- ถ้าเป็น 0 ดังนั้นมันก็จะไม่ Count, ต้องเป็น 1 ถึงจะทำงาน
- ทำไมต้องมัน 2 Enable Signal มีเหตุผลอยู่ แต่ไม่บอกหรอก → ใน Course นี้ให้เป็น High ทั้งคู่ไว้
- 8 —
- 9 — → Active Low
- บอกว่าจะ Load เข้า Counter นะ → กำลังจะเอา Input เข้าใส่ Counter
- 11-14 — Output
- 15 — → Determine ว่า full count รึยัง about to overflow
- 16 —
- 1 — → Active Low Clear Signal
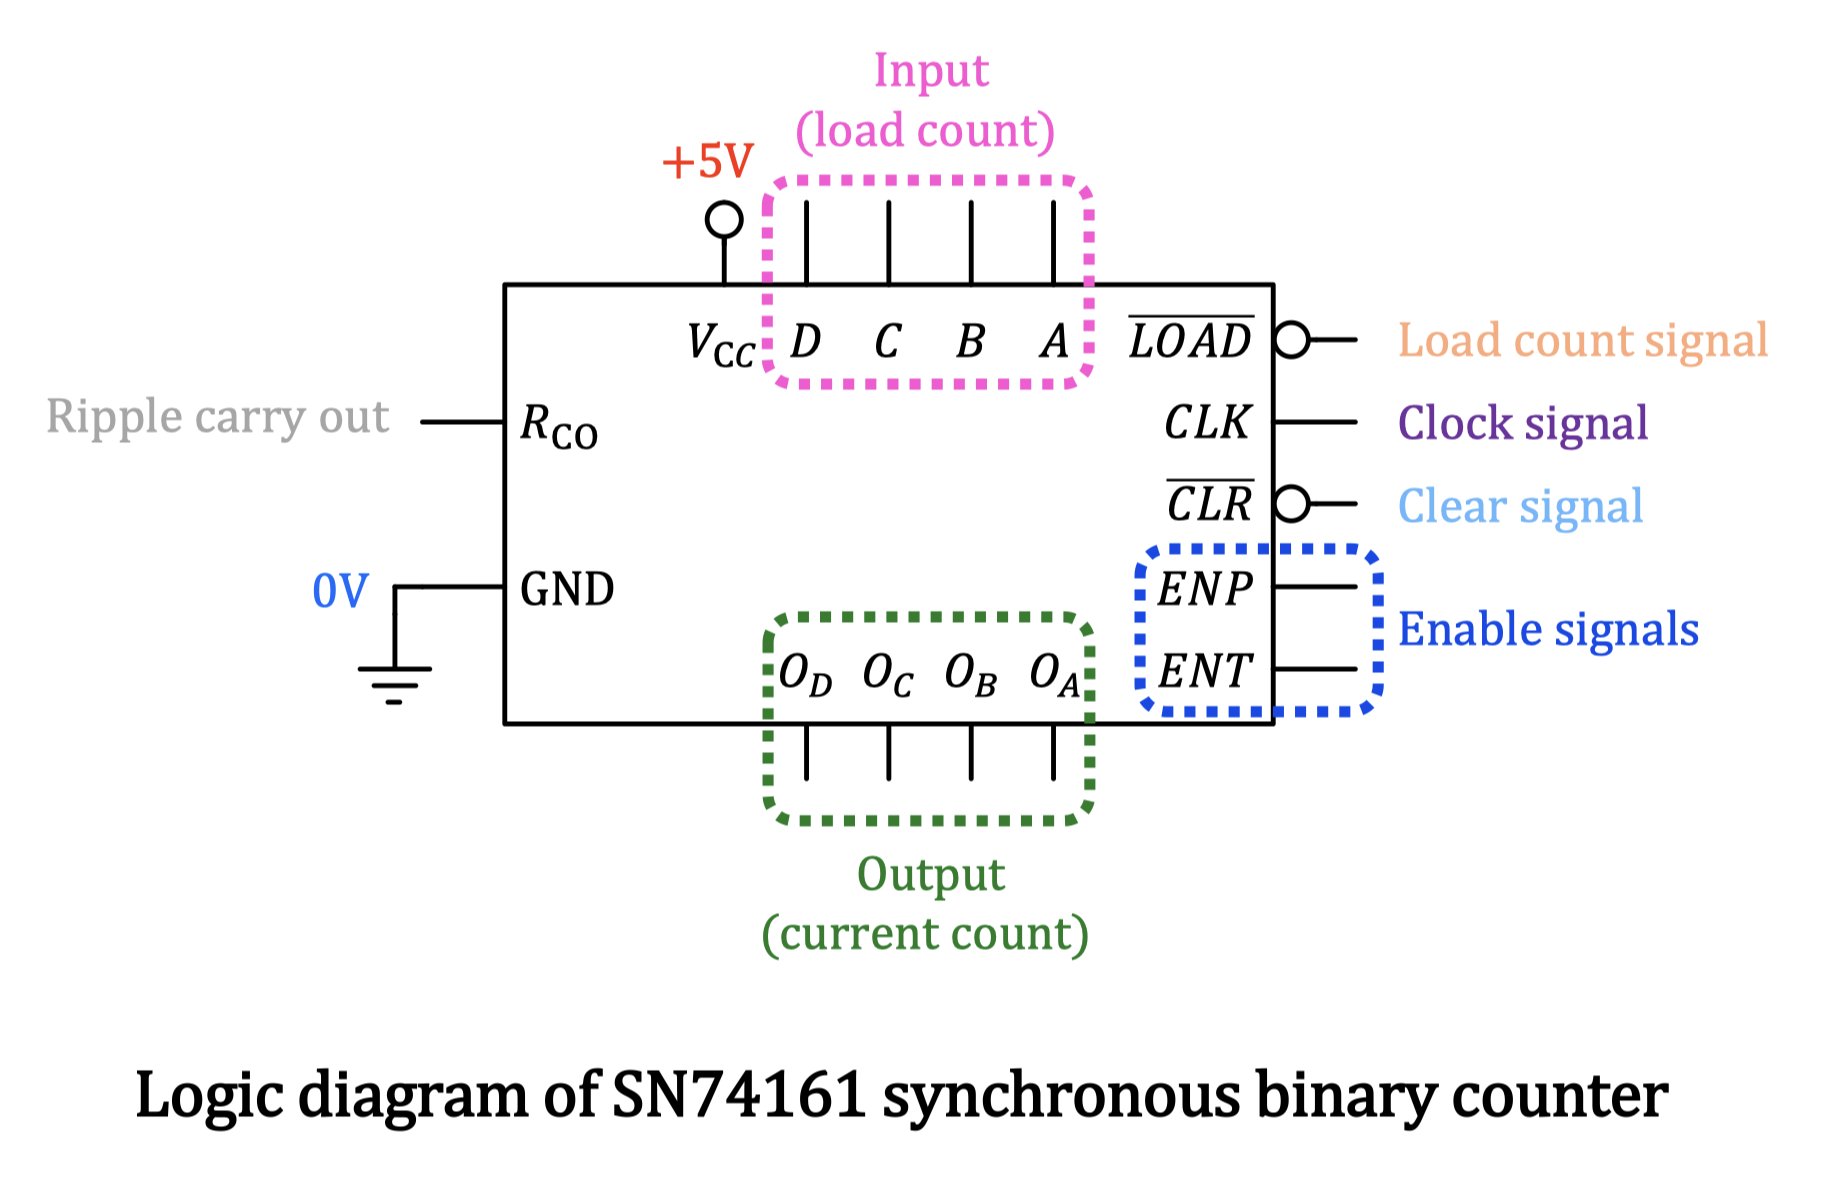
ใน #FinalExam ถ้าไม่ต่อ กับ ไม่ได้คะแนนเลยนะ
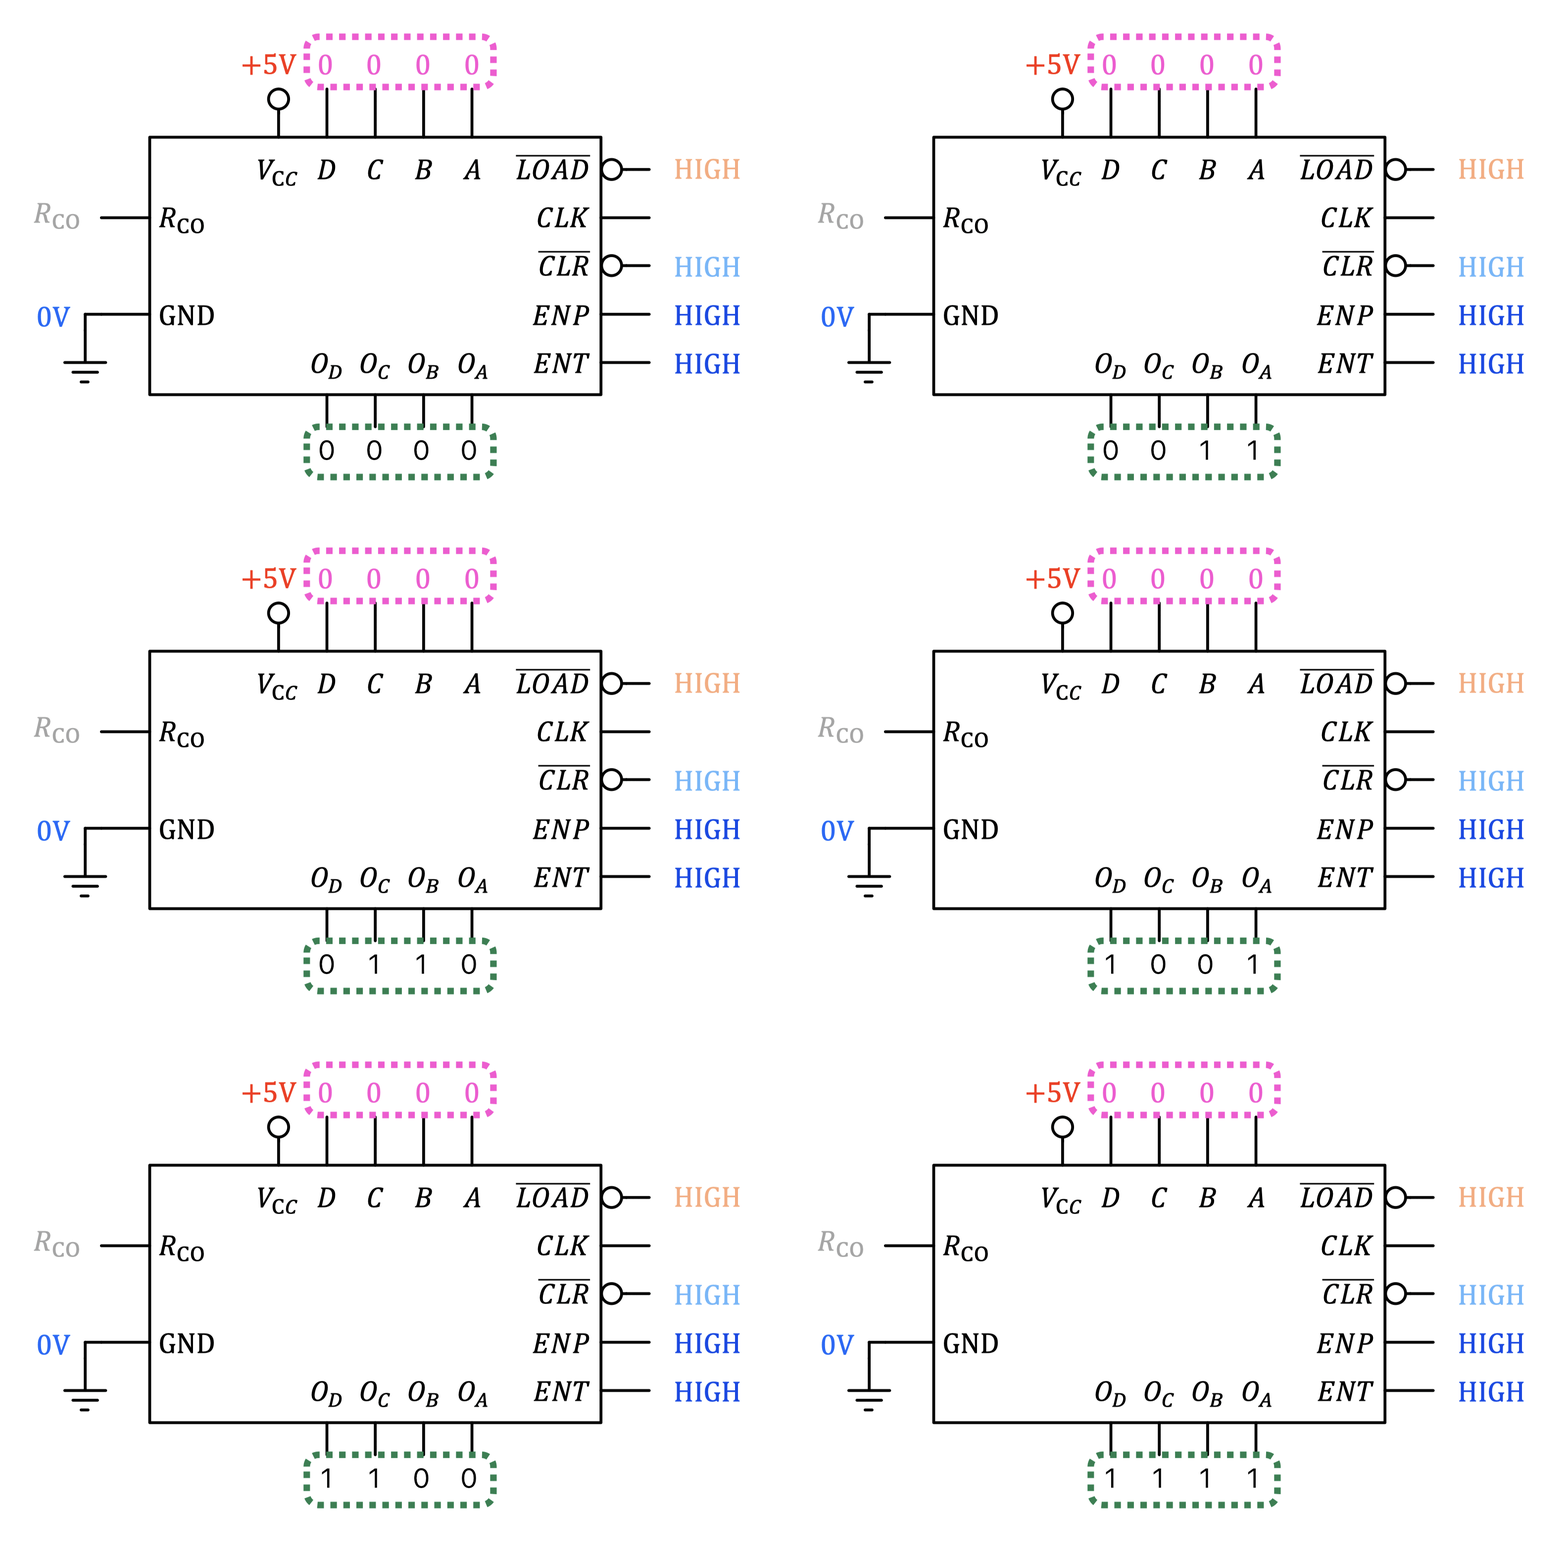
Example 1: 4-bit Binary Counter
- Count 0 ถึง 15 (16 numbers)
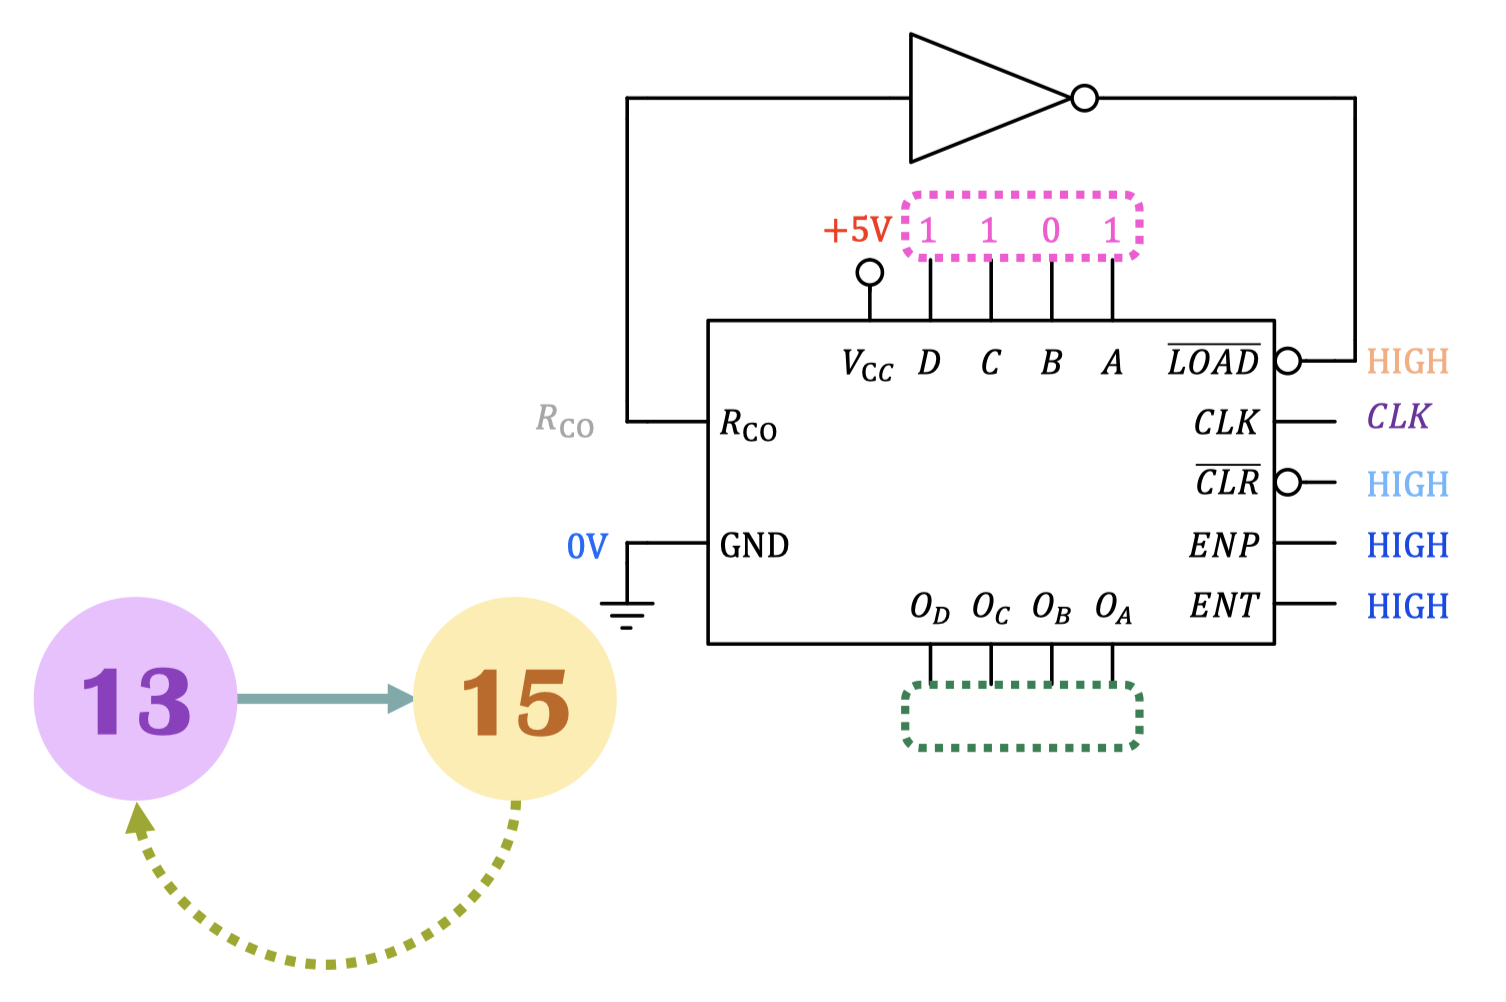
Example 2: Truncated Counter (Carry-Out)
จะใช้กรณีนี้ได้ก็ต่อเมื่อ Count ถึงมากสุดคือเลข 15
- Design a truncated sequence counter with a modulus of 3 (mod-3) that counts from 13 to 15.
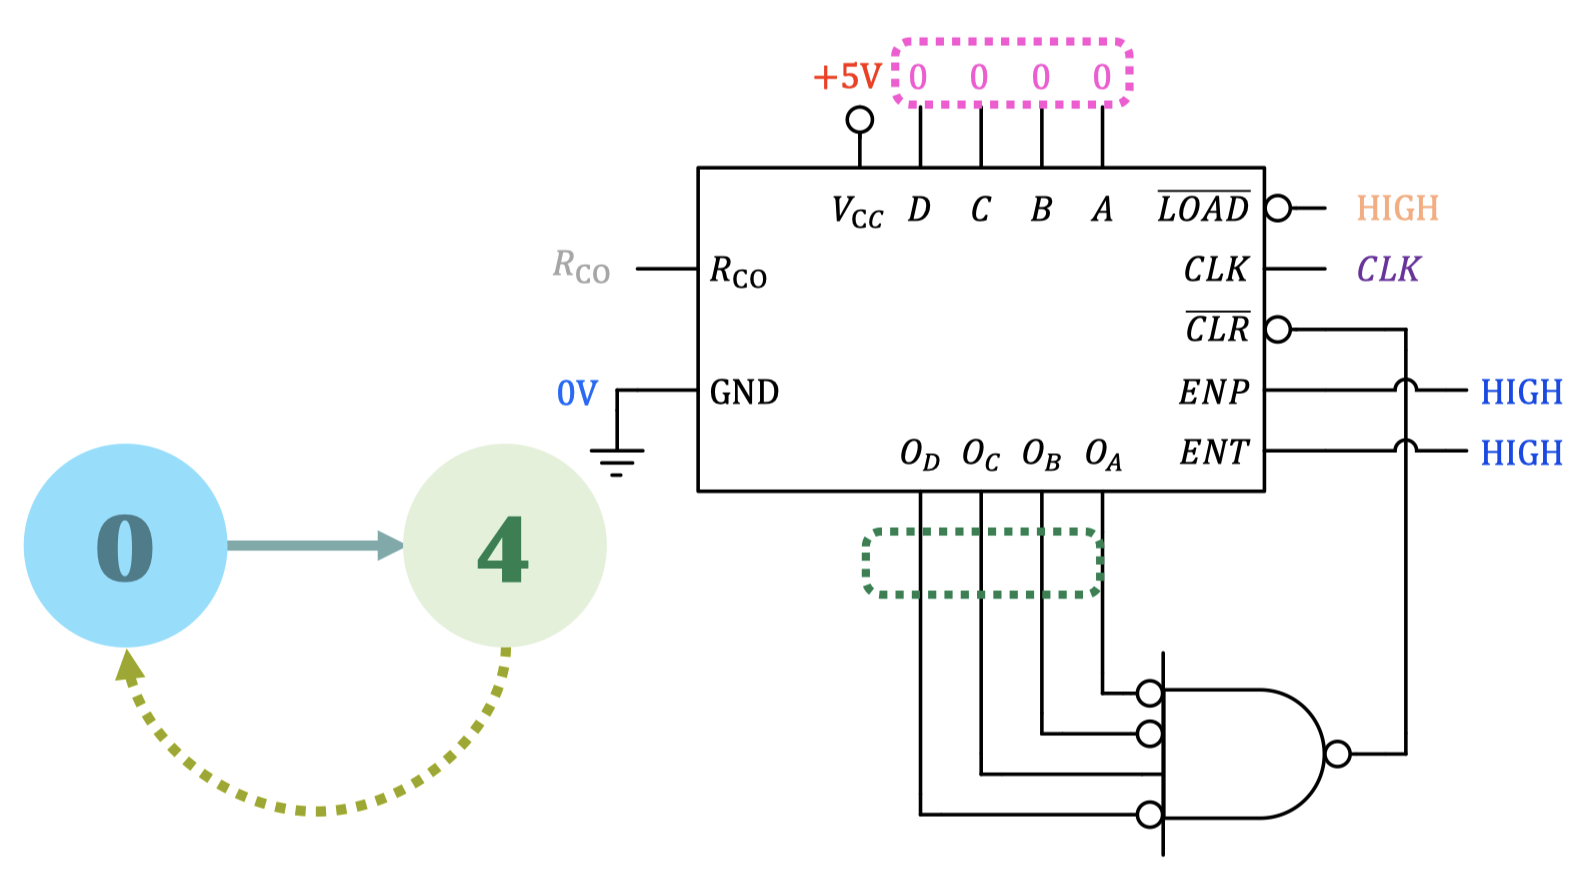
Example 3:
NAND Gate ก็ต่อเมื่อใช้ Active Low
- Design a truncated sequence counter with a modulus of 5 (mod-5) that counts from 0 to 4.
Question
คือตัว IC มันนับ 0-15 ไปเรื่อย ๆ อยู่แล้ว แค่เราต้องสร้าง Logic บางอย่างมาครอบเฉย ๆ โดยใช้ CLR อะไรแบบนี้ใช่มั้ยครับ
คำตอบ
Example 4: Cascaded Counters
- ข้อนี้คือ Part แรกของ #FinalExam (5 คะแนน แรก! NO TRICKS)
6 Steps For Making Cascaded Counters
- Determine the total number of chips required based on largest count
- ขึ้นอยู่กับตัวเลขที่เราจะนับถึงสูงสุดด้วย สมมติมี 2 ตัว → 8-bit นับได้ถึง เลย
- ==Connect the power supply, ground, and clock pins for ALL chips (สำคัญมาก!!!!)==
- Connect the enable pins for ALL chips
- Place the load input value
- Construct a NAND gate decoder for the load signal
- Construct a NAND gate decoder for the clear signal
- Design a truncated sequence counter that counts from 0 to 125 and then 175 to 250.
- Once the count reaches 250, the counter should repeat the sequence from 0.
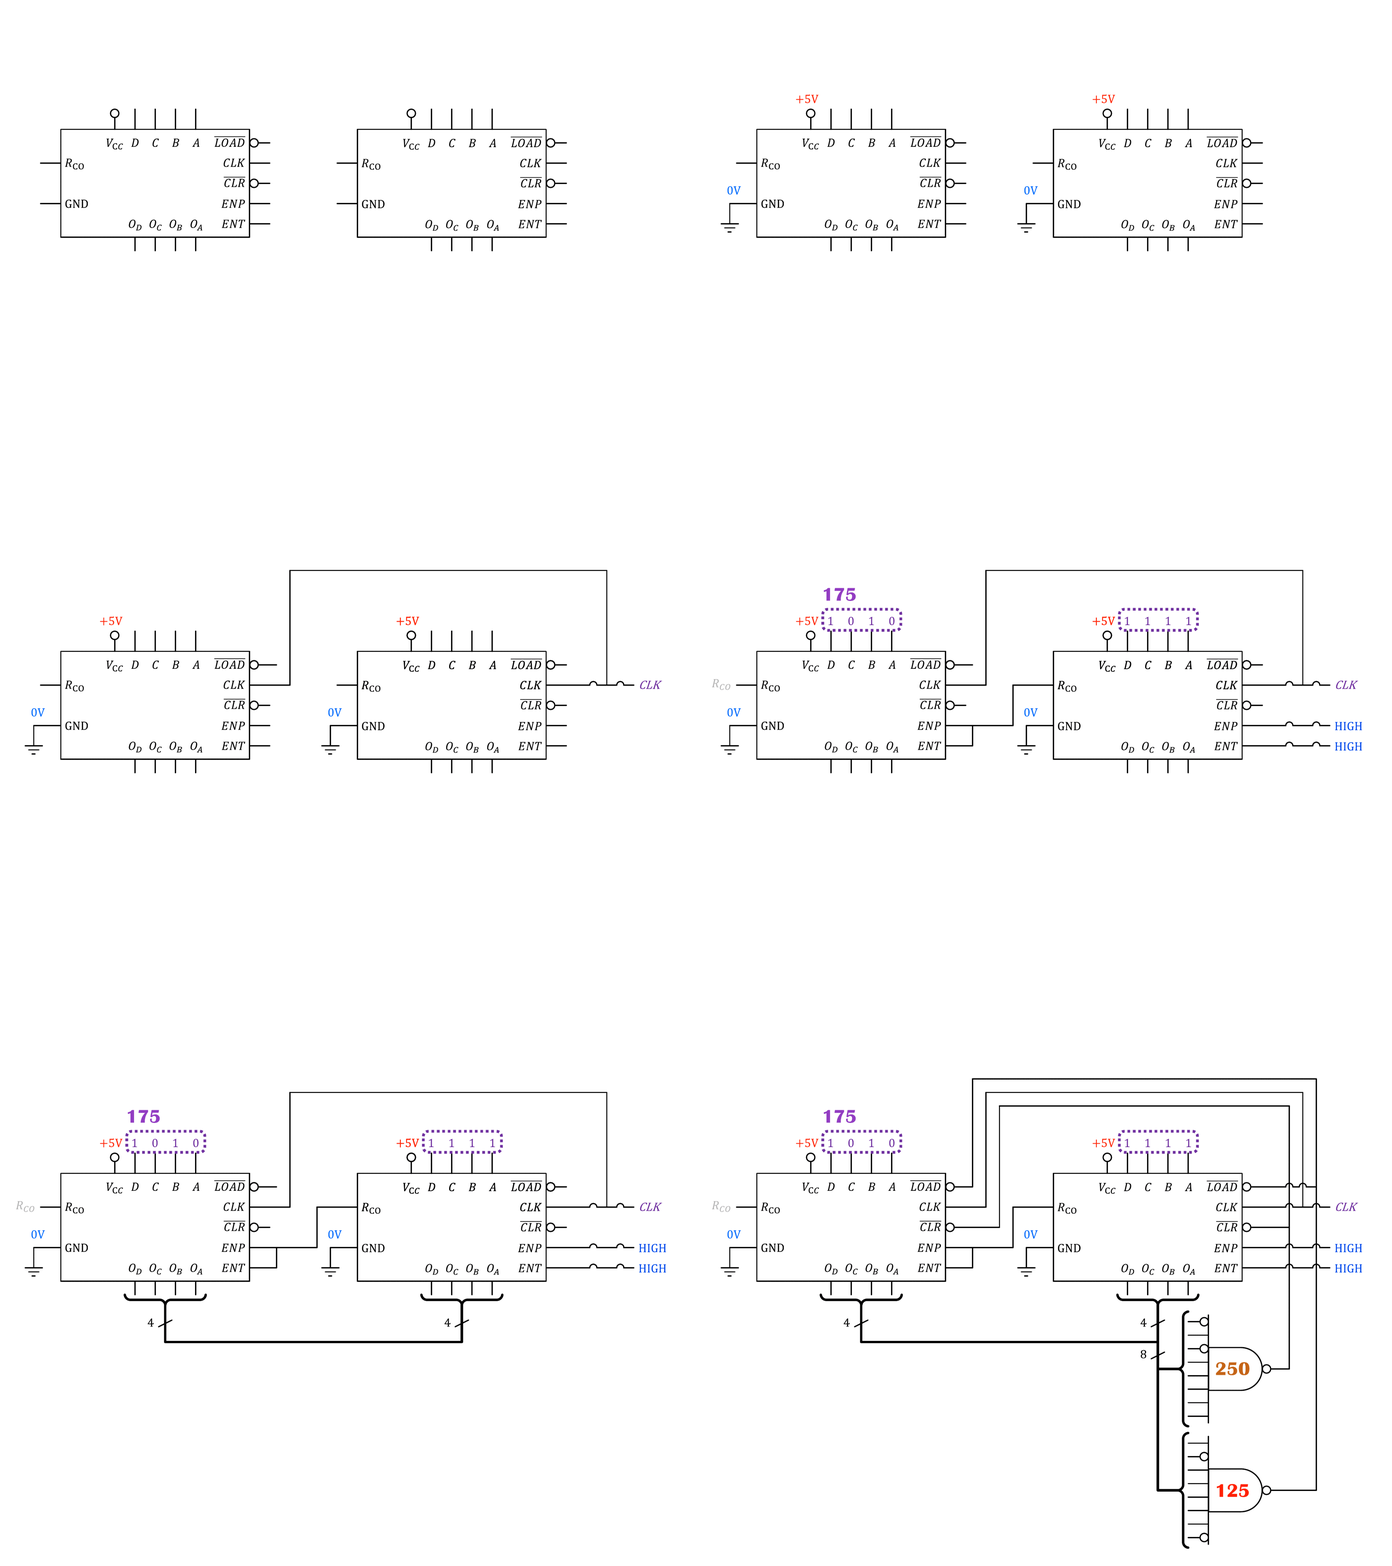
- สังเกตว่า Enables ของ IC ฝั่งซ้าย จะไปเชื่อมกับ (of previous chip) เพราะเป็นสัญญาณเวลาที่ใกล้จะ Overflow มันถึงจะ Enable ขึ้นมา
- เอา Calculator เข้าไป Convert พวกเลข 125 แล้วต้องต่อให้ถูกด้วยนะ
- ถ้าจะเขียนแบบย่อให้ Binary จากล่างขึ้นบน