#Summarized
Interrupts in Arduino
Interrupts allow an Arduino program to respond immediately to specific events, pausing the main program flow to execute special code (Interrupt Service Routine or ISR) when triggered.
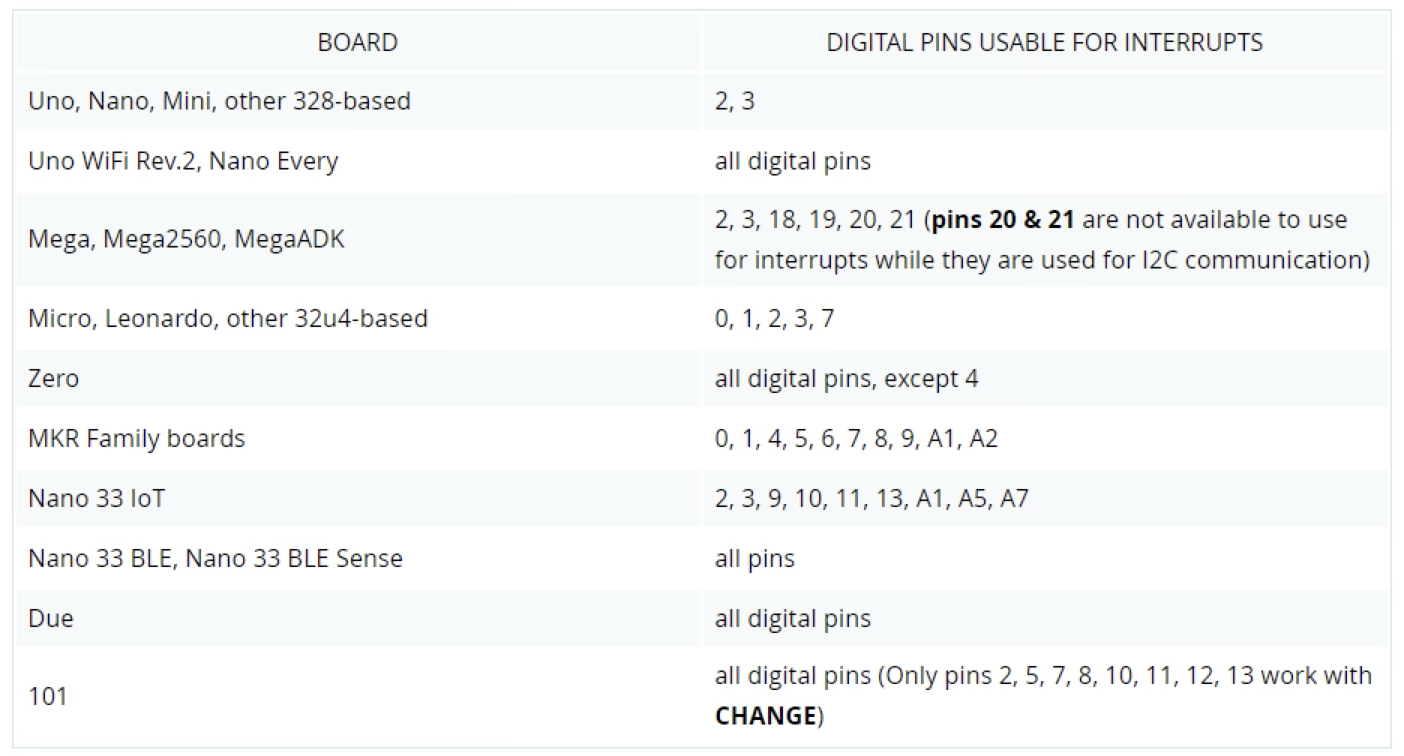
External Interrupts with attachInterrupt()
attachInterrupt(digitalPinToInterrupt(pin), ISR, mode)- Parameters:
interrupt: Interrupt number (int)pin: Arduino pin numberISR: The function to call when interrupt occurs (takes no parameters, returns nothing)mode: When interrupt triggers:LOW: Trigger when pin is lowCHANGE: Trigger when pin changes valueRISING: Trigger when pin goes from low to highFALLING: Trigger when pin goes from high to low
Example Code:
const byte ledPin = 13;
const byte interruptPin = 2;
volatile byte state = LOW;

void setup() {
  pinMode(ledPin, OUTPUT);
  pinMode(interruptPin, INPUT_PULLUP);
  attachInterrupt(digitalPinToInterrupt(interruptPin), blink, CHANGE);
}

void loop() {
  digitalWrite(ledPin, state);
}

void blink() {
  state = !state;
}
Think of this like how your iPhone interrupts whatever app you're using when a call comes in - the phone instantly switches to the call screen, regardless of what you were doing!
Timers in Arduino
Timer Libraries
Arduino has several third-party timer libraries:
- TimerOne: Arduino TimerOne Reference
- arduino-timer: Arduino-timer Reference
These provide simple interfaces for operating hardware timers, which can be used as internal interrupt sources.
Timer1 Class
Available timer classes include:
- Timer1
- Timer3
- TimerThree
Key Methods:
initialize(period): Sets timer interval (default 1 second)setPeriod(period): Sets period in microseconds (1μs to ~8.3s)pwm(pin, duty, period): Generates PWM signal on specific pinsattachInterrupt(function, period): Calls function at specified intervaldetachInterrupt(): Disables attached interruptdisablePwm(pin): Turns off PWM for a pinread(): Reads time since last rollover in microseconds
Timer1 Example:
#include "TimerOne.h"

void setup()
{
  pinMode(10, OUTPUT);
  Timer1.initialize(500000);         // initialize timer1, 1/2 second period
  Timer1.pwm(9, 512);                // setup pwm on pin 9, 50% duty cycle
  Timer1.attachInterrupt(callback);  // attaches callback() as timer overflow interrupt
}

void callback()
{
  digitalWrite(10, digitalRead(10) ^ 1);
}

void loop()
{
  // your program here...
}
This is similar to how Apple's iPhone processes background tasks at precise intervals even while you're using other apps - like how notifications are checked or how the Health app records steps at regular intervals.
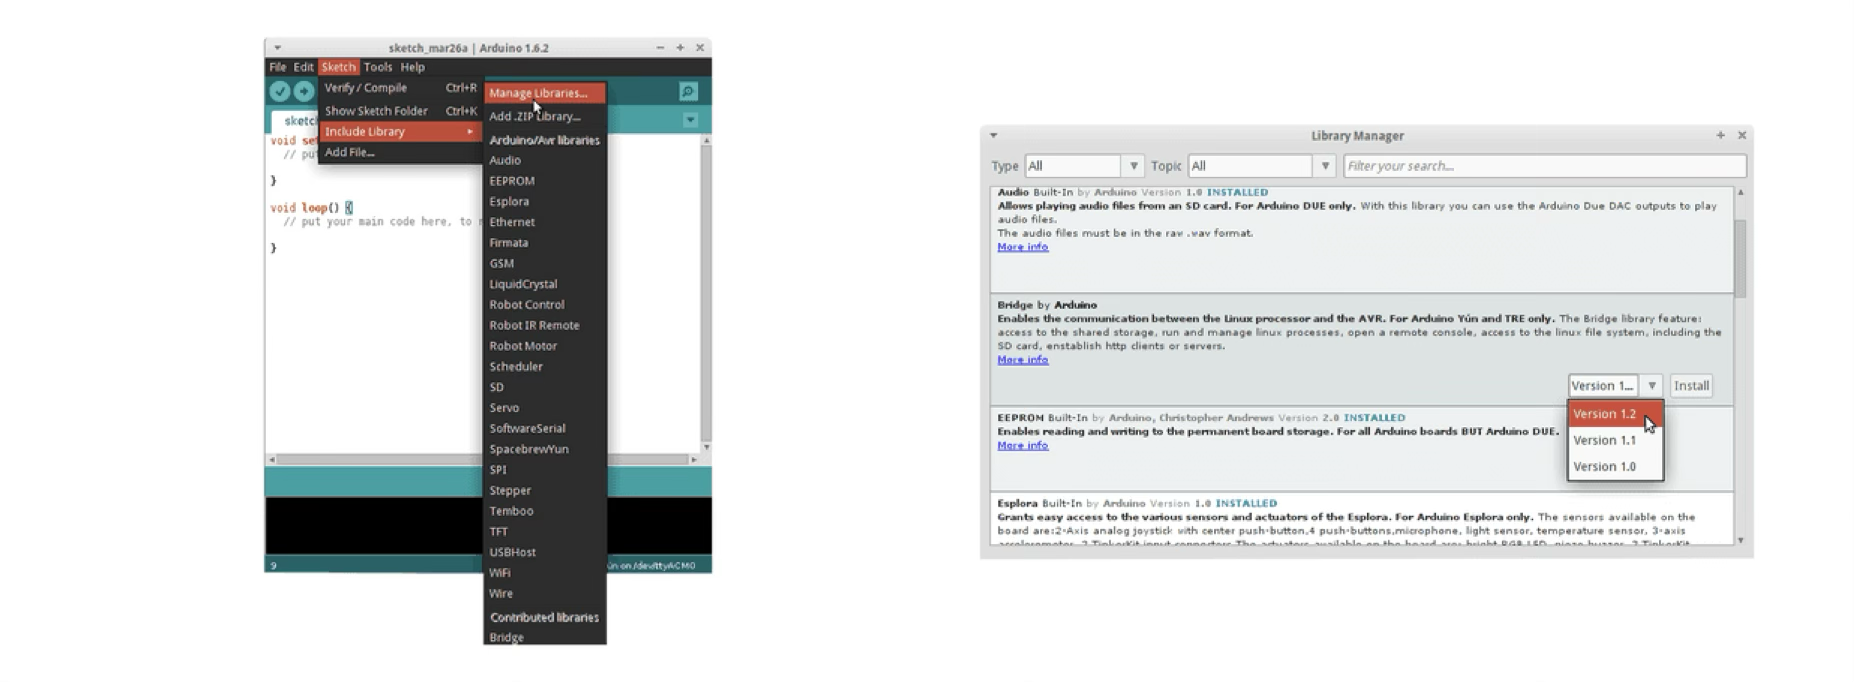
Installing External Libraries
- From repositories via Library Manager
- Manual installation
Difference Between Built-in Timer and Timer Libraries
Built-in Timer:
- Arduino has hardware timers built into the microcontroller itself
- Requires direct register manipulation (complex, low-level coding)
- More efficient but harder to program
- Similar to how Apple's A-series chips have built-in timing circuits at the hardware level
Timer Libraries (like Timer1):
- Provide simpler, object-oriented interface to the hardware timers
- Hide complex register operations behind user-friendly functions
- Easier to use but slightly less efficient
- Similar to how Apple provides high-level APIs that make it easier for developers to use the underlying hardware