#Summarized
Introduction to Arduino Programming using Arduino IDE
Introduction to Arduino
- Arduino is an open source microcontroller platform used for sensing digital/analog inputs and controlling digital outputs
- Being open source means the hardware design is freely available to the public to use and modify without restrictions
- No patent or copyright violations when modifying the Arduino for personal projects
Arduino UNO Hardware Overview
Pin Layout
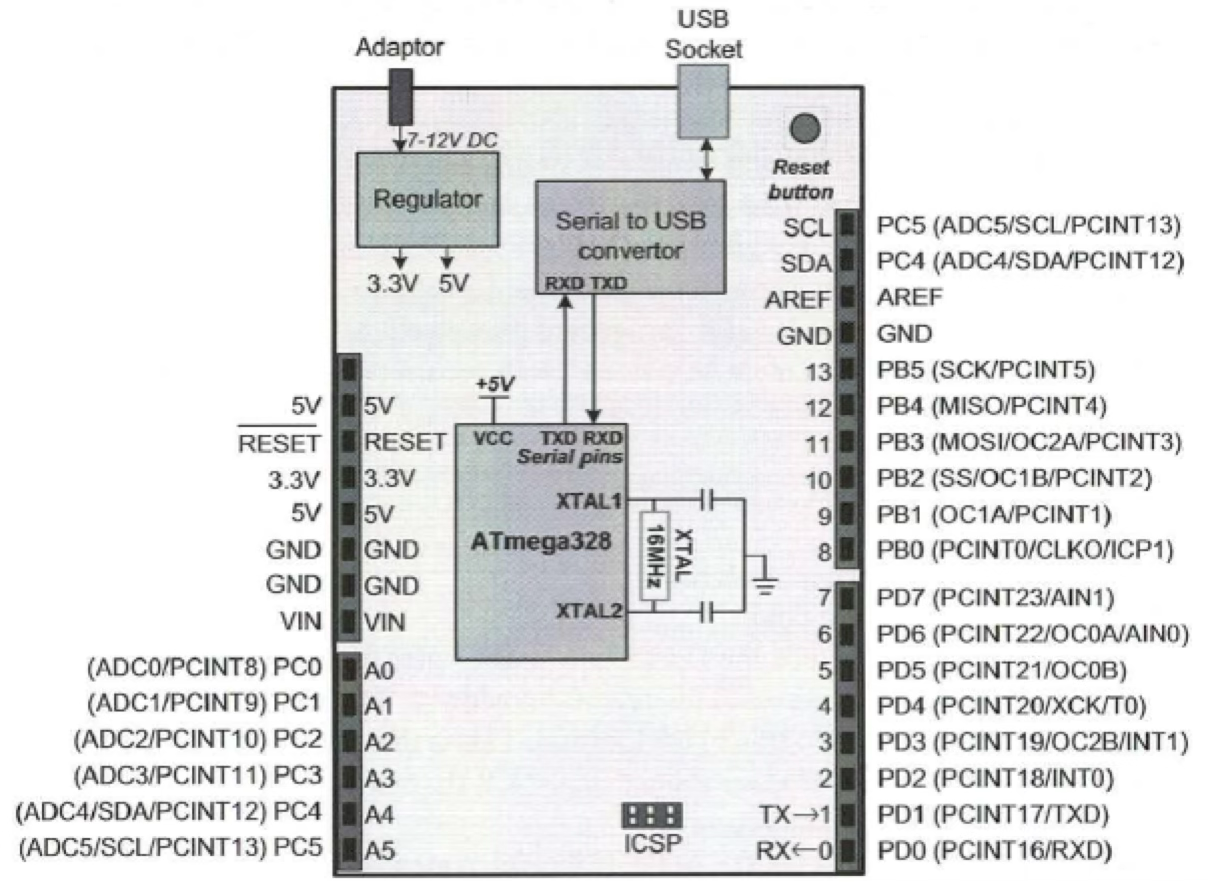
Board Layout
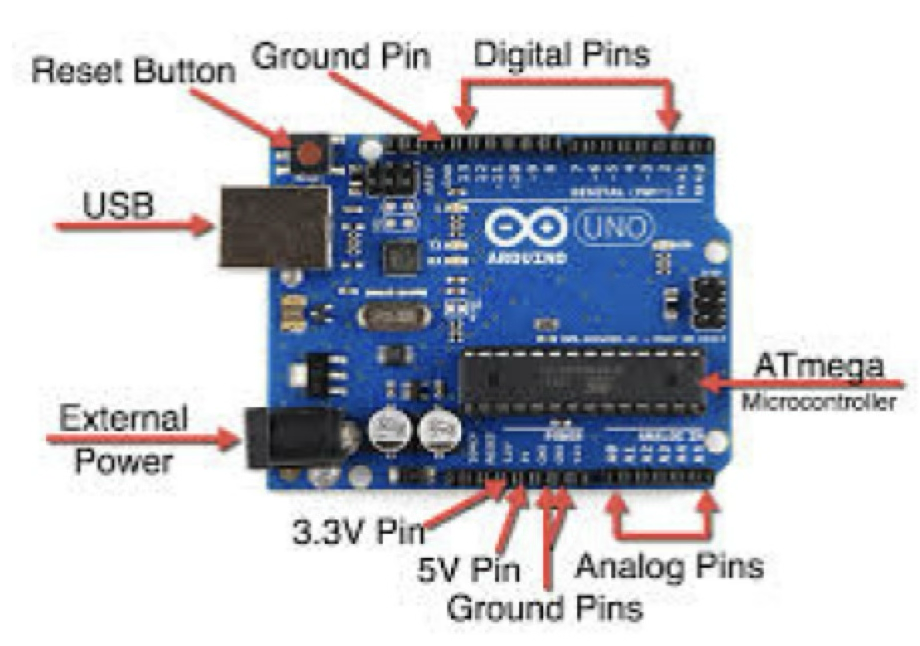
Key Interfaces
- 14 digital I/O pins: numbered 1-13
- 6 analog input pins: labeled A0-A5
- 6 PWM pins: marked with the ~ symbol
- Communication protocols: USART (Tx/Rx pins), I2C, SPI
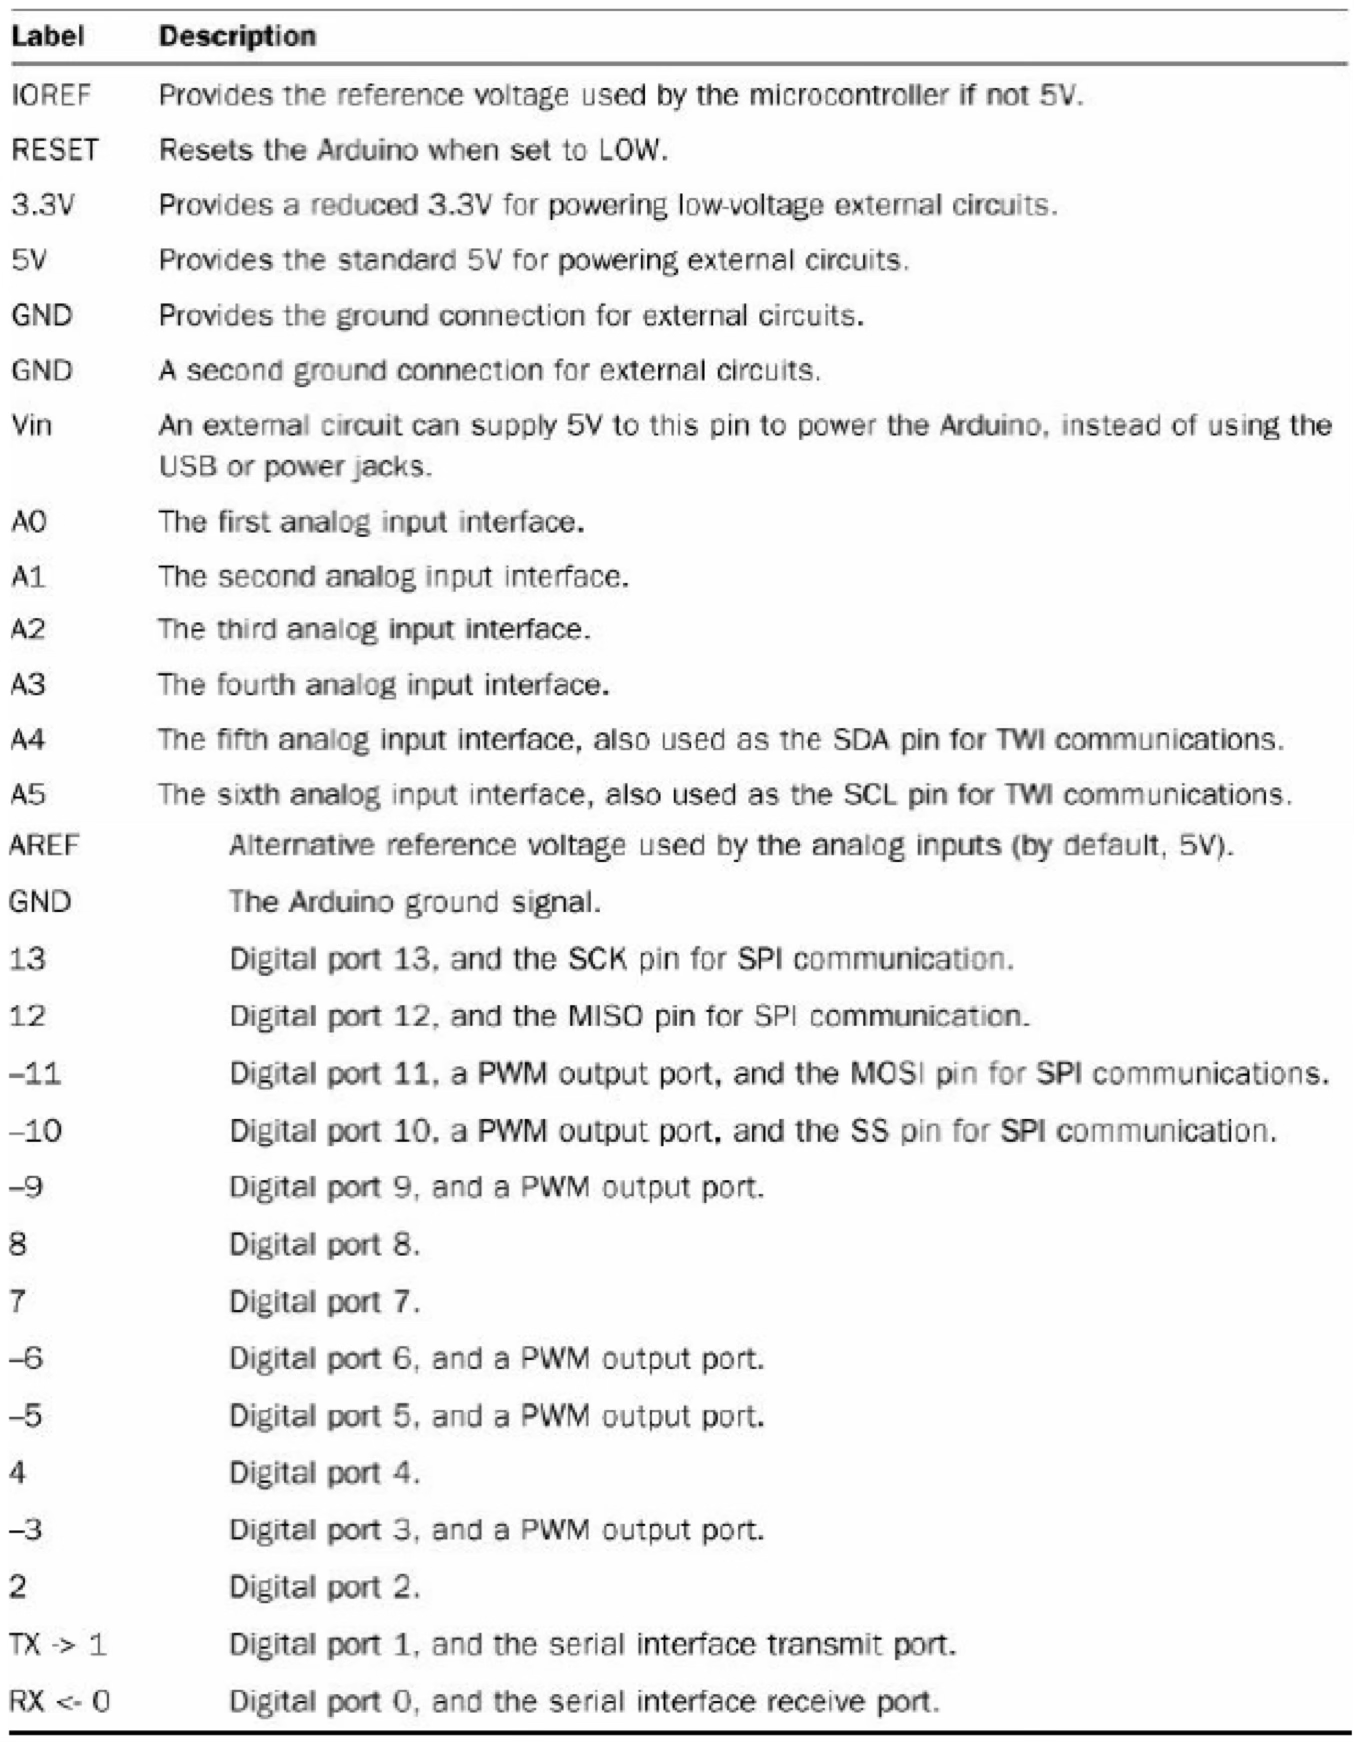
Pin Details
Arduino IDE Basics
Overview
- Arduino IDE is the software used to program the Arduino UNO
- Uses the Arduino programming language (a variant of C++)
- Programs written for Arduino are called "sketches"
- Download link: https://www.arduino.cc/en/main/software
Setup Process
- Connect Arduino UNO to computer and note the COM port number
- Open Arduino IDE
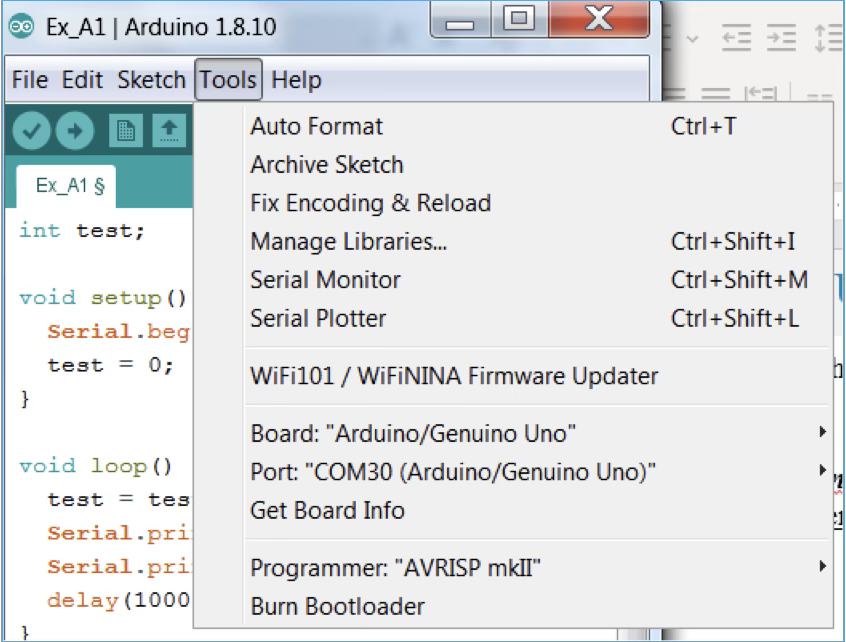
- Select Tools > Board > Arduino/Genuino UNO
- Select Tools > Port and choose the correct COM port
IDE Interface
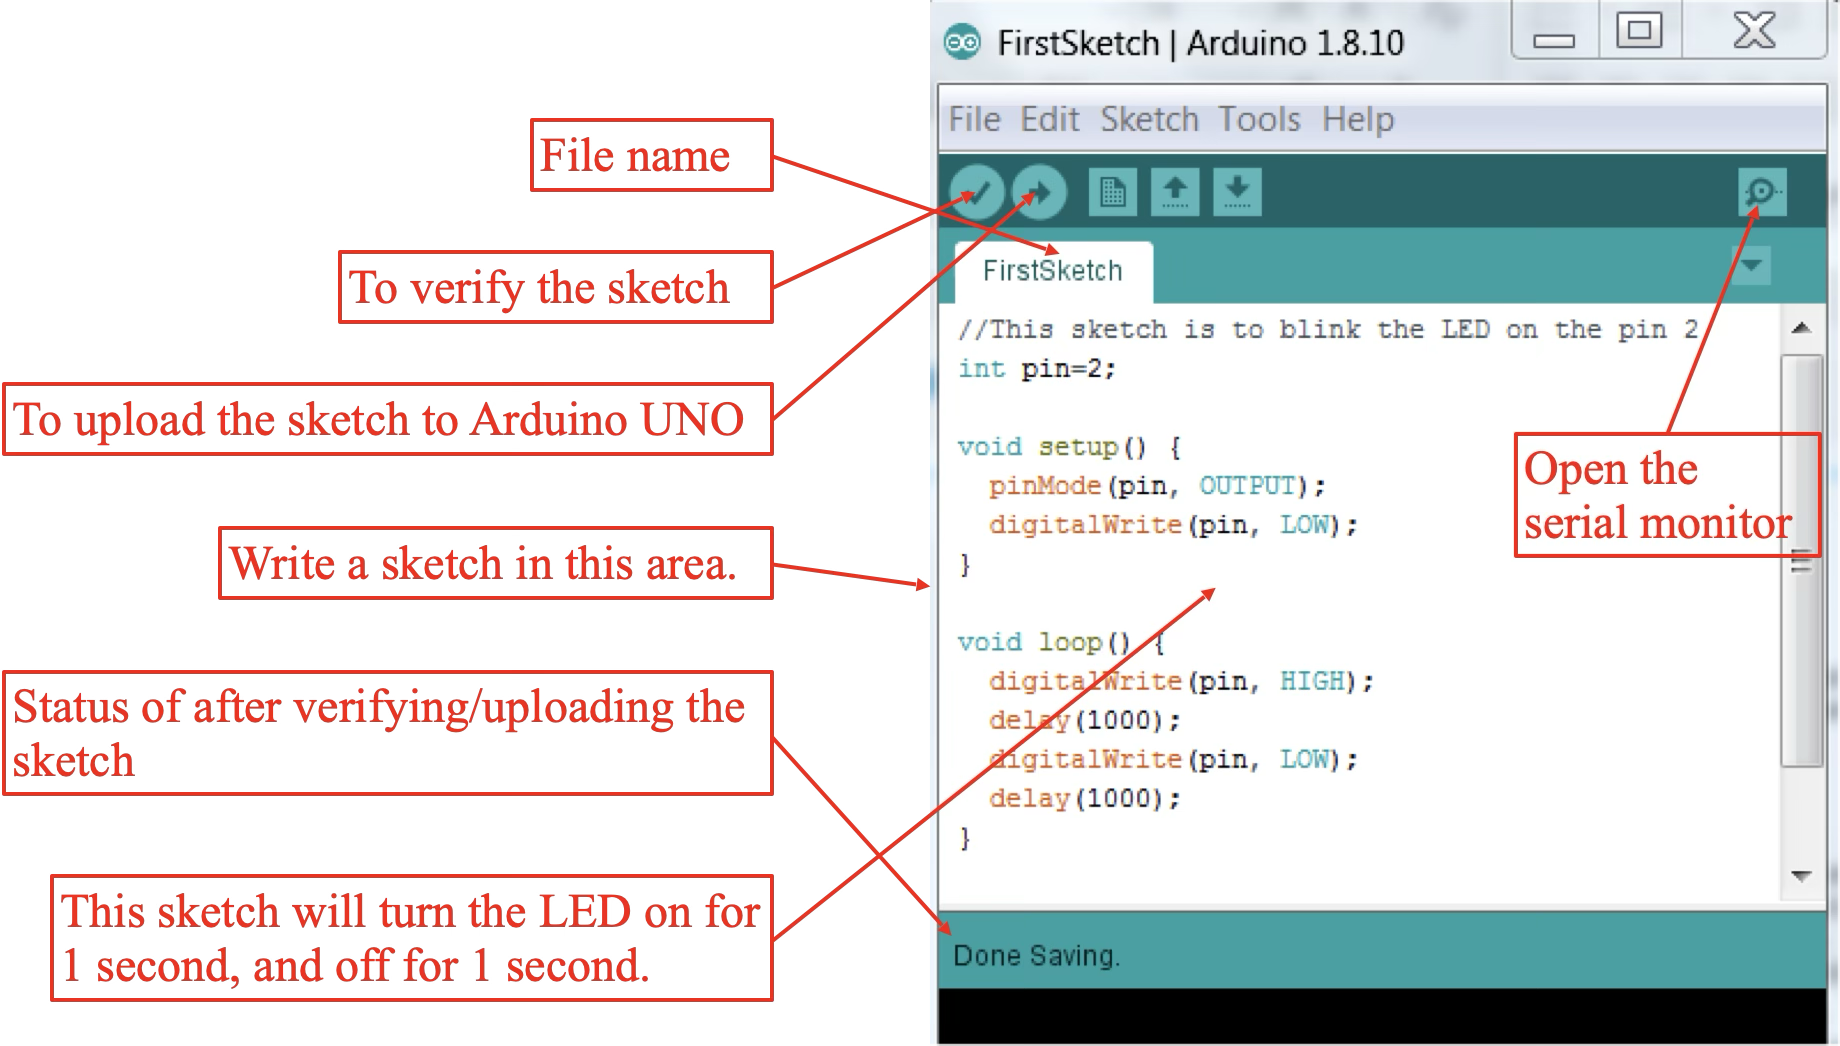
Programming Workflow
- Write your sketch in the Arduino IDE
- Click the Verify button to check for errors
- Click the Upload button to compile and transfer your sketch to the Arduino UNO
Arduino Sketch Layout/Structure
Basic Structure
Arduino programs (known as "sketches") follow a specific structure:
#include <header file>

// Global variable declaration
type variable = value;

void setup() {
    command;
    command;
    // ...
}

void loop() {
    command;
    command;
    // ...
}
Core Components
Arduino sketches are executed line-by-line from top to bottom and consist of four main parts:
- Header Files
- External library files that provide additional functionality
- Included at the beginning using the
#includedirective - Example:
#include <Servo.h>for servo motor control
- Global Variables
- Variables declared outside of any function
- Accessible throughout the entire sketch
- Used to store data that needs to persist across function calls
- setup() Function
- Runs exactly once when the Arduino powers on
- Used for initialization tasks:
- Setting pin modes (input/output)
- Initializing serial communication
- Setting initial states
- The bootloader specifically looks for this function at startup
- loop() Function
- Contains the main program code
- Executes repeatedly until power is disconnected
- Core of most Arduino applications
- The bootloader jumps to this function after setup() completes
Example: LED Blink
// This sketch blinks an LED connected to pin 2

// Global variable declaration
int pin = 2;  // LED connected to digital pin 2

void setup() {
    pinMode(pin, OUTPUT);    // Set pin as an output
    digitalWrite(pin, LOW);  // Ensure LED starts in OFF state
}

void loop() {
    digitalWrite(pin, HIGH);  // Turn LED ON (HIGH = 1 = 5V)
    delay(1000);             // Wait for 1 second (1000 milliseconds)
    digitalWrite(pin, LOW);   // Turn LED OFF (LOW = 0 = 0V)
    delay(1000);             // Wait for 1 second
}
How It Works
- A global variable
pinis declared and set to 2, specifying which pin controls the LED - In
setup():pinMode(pin, OUTPUT)configures pin 2 as an outputdigitalWrite(pin, LOW)ensures the LED starts in the OFF state
- In
loop():- The LED alternates between ON and OFF states with 1-second intervals
digitalWrite(pin, HIGH)sets pin 2 to 5V (ON)digitalWrite(pin, LOW)sets pin 2 to 0V (OFF)delay(1000)pauses execution for 1000 milliseconds (1 second)
Basic Arduino Programming Commands
Working with Variables
Declaration
Variables must be declared before use:
datatype variable_name;Example:
int pin; // Declares an integer variable named 'pin'Variable Names
- Can contain letters, numbers, underscores, dollar signs
- Must start with a letter
- Are case-sensitive
- No length limit
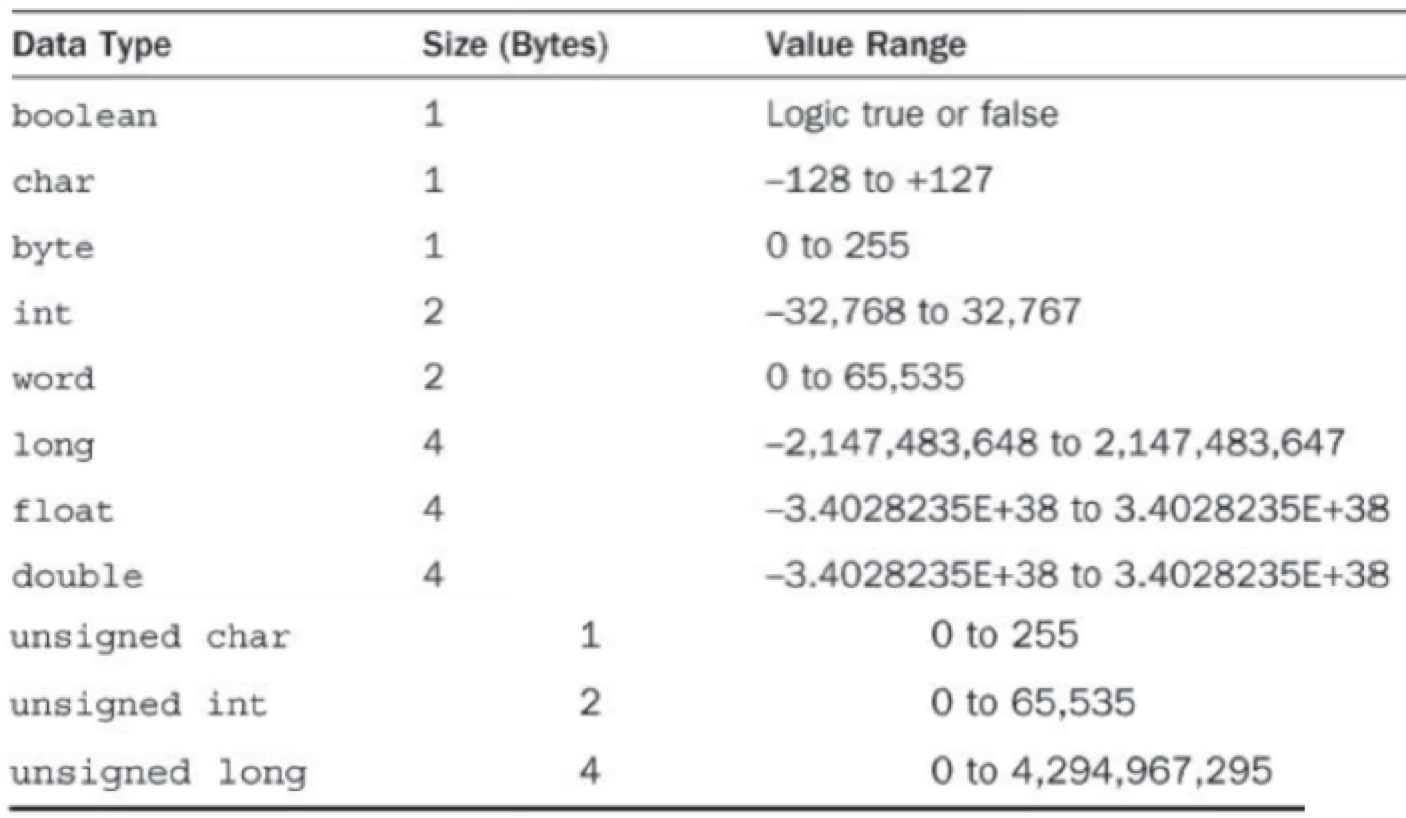
Data Types
Data types define value ranges and memory usage:
Variable Scope
- Global variables: Declared outside any function, accessible everywhere
- Local variables: Declared inside a function, accessible only within that function
Math Operations
Standard Operators
+(addition)-(subtraction)*(multiplication)/(division)%(modulo/remainder)
Compound Operators
Shorthand for math assignments:
count += 1;  // Same as: count = count + 1;
x -= 5;      // Same as: x = x - 5;
y *= 2;      // Same as: y = y * 2;
z /= 4;      // Same as: z = z / 4;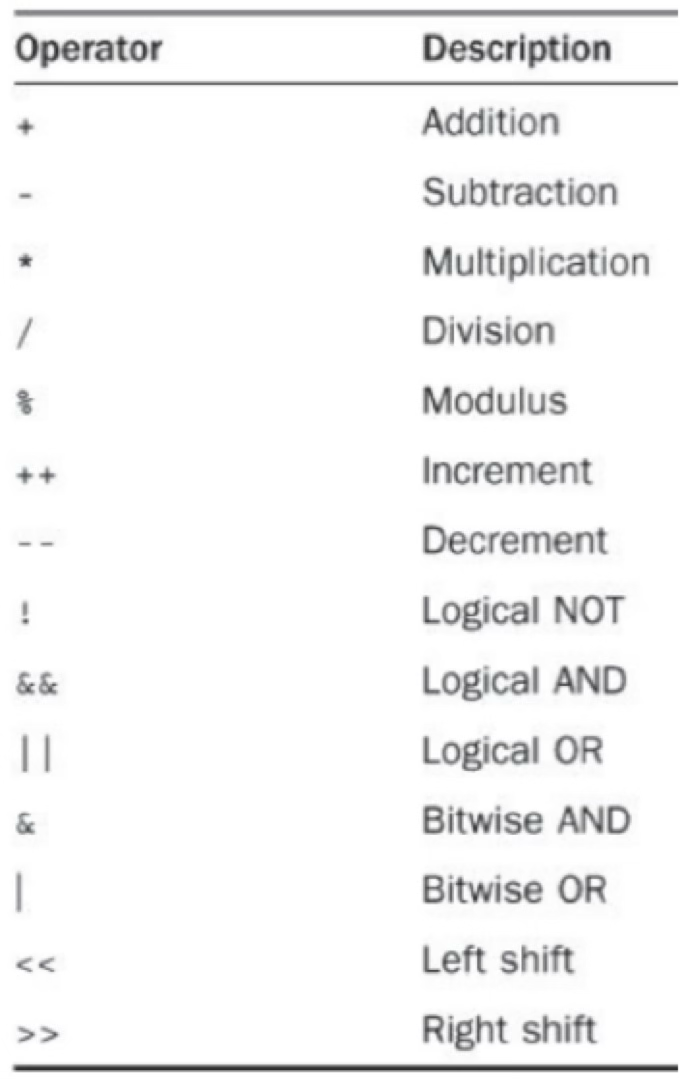
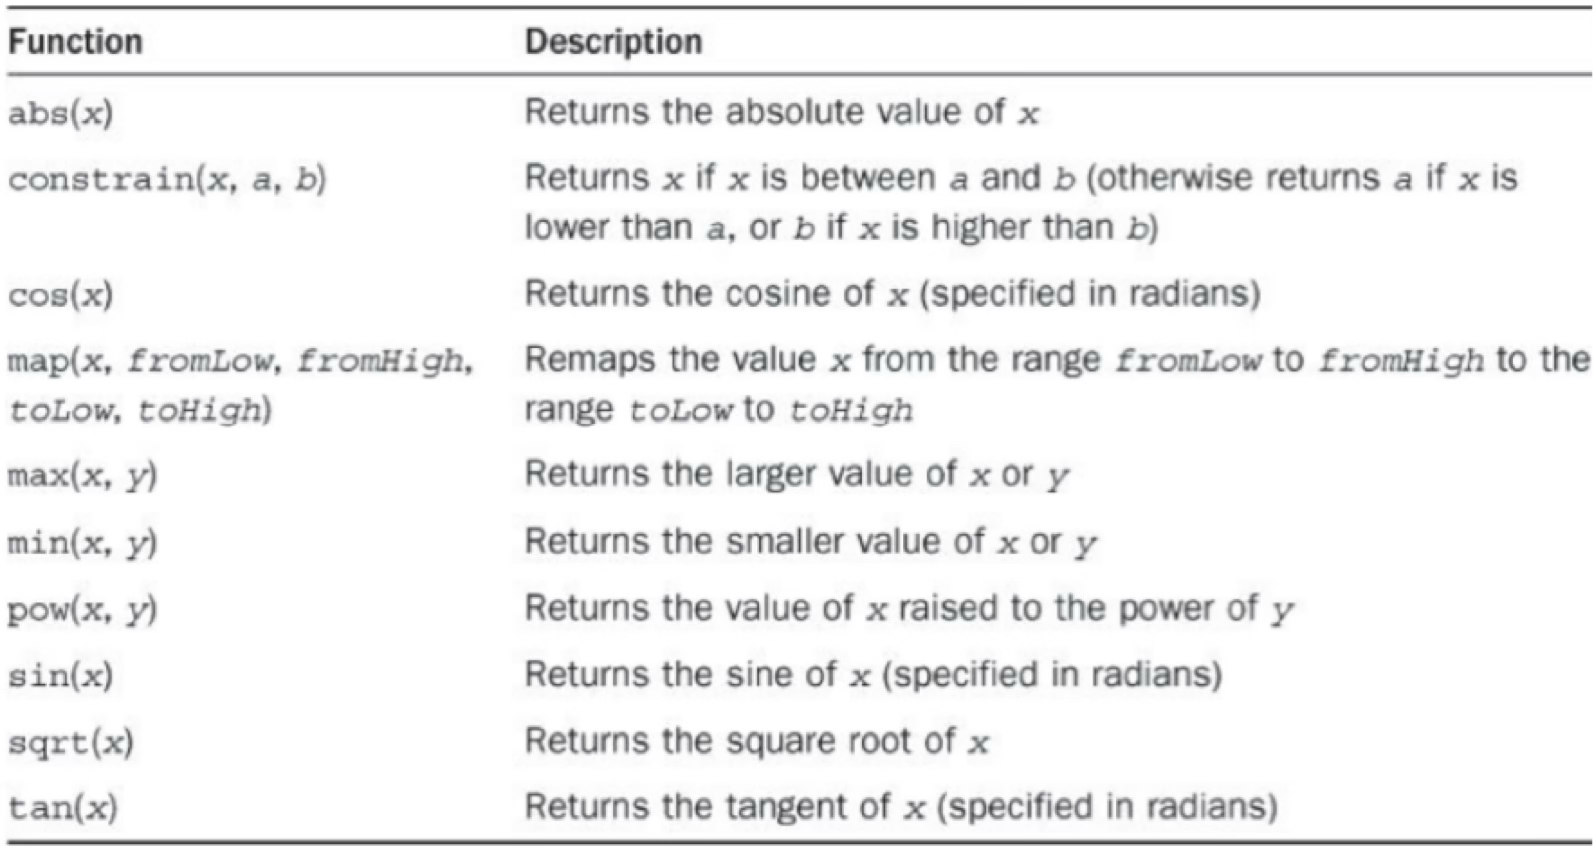
Advanced Math Functions
Serial Monitor
A terminal window in Arduino IDE for:
- Sending messages from Arduino to computer
- Receiving messages from computer to Arduino
Key Commands
Serial.begin(9600);          // Initialize at 9600 baud rate
Serial.print("Message");     // Print text
Serial.println("Message");   // Print text with newline
Serial.print(variable);      // Print variable value
Serial.println(variable);    // Print variable value with newline
Example output: 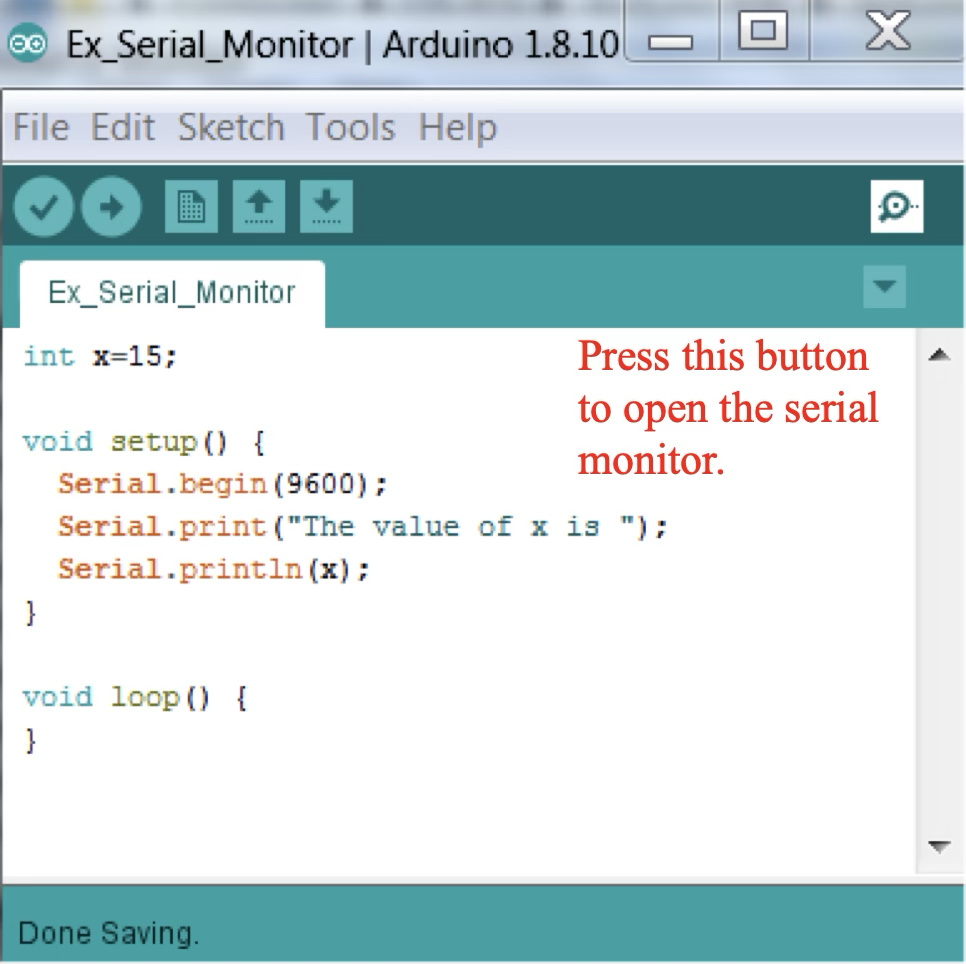
Time Delays
Commands
delay(ms);              // Pause for milliseconds
delayMicroseconds(us);  // Pause for microseconds
Example:
delay(1000);              // Wait 1 second
delayMicroseconds(1000);  // Wait 1000 microseconds (1 ms)
Comparison Conditions
Numeric Comparisons
Return TRUE or FALSE:
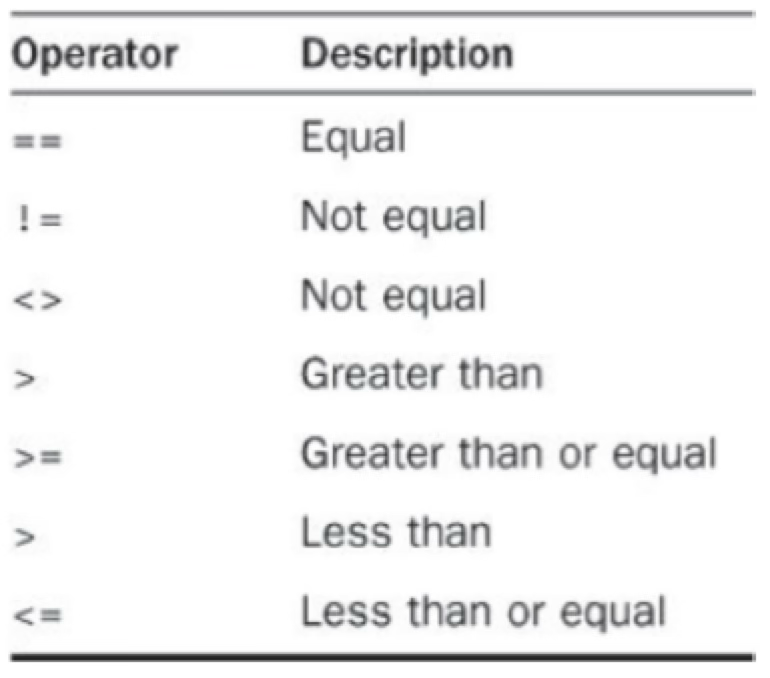
Compound Conditions
Combine multiple conditions:
&&(AND): Both must be true||(OR): At least one must be true
Examples:
(x == 1) && (y > 5)    // TRUE if x is 1 AND y is greater than 5
(x >= -10) || (y != 0)  // TRUE if x is >= -10 OR y is not 0
Boolean Conditions
- Non-zero values = TRUE
- Zero value = FALSE
Conditional Statements
if Statement
if (condition) {
    // Code executed if condition is TRUE
}
if-else Statement
if (condition) {
    // Code executed if condition is TRUE
} else {
    // Code executed if condition is FALSE
}
if-else if-else Statement
if (condition1) {
    // Code executed if condition1 is TRUE
} else if (condition2) {
    // Code executed if condition2 is TRUE
} else if (condition3) {
    // Code executed if condition3 is TRUE
} else {
    // Code executed if no conditions are TRUE
}
Loops
while Loop
Repeats until condition is FALSE:
while (condition) {
    // Code to repeat
}
do-while Loop
Executes at least once, then repeats until condition is FALSE:
do {
    // Code to repeat
} while (condition);
for Loop
For counted iterations:
for (initialization; condition; update) {
    // Code to repeat
}
Example:
for (int i = 0; i < 10; i++) {
    // Repeats 10 times with i from 0 to 9
}
Custom Functions
Definition
returnType functionName(paramType paramName) {
    // Function code
    return value;  // Return a value of returnType
}
When to Use
- For repeated code blocks
- To organize code logically
- To create reusable components
Example
int calculateArea(int width, int height) {
    int area = width * height;
    return area;
}
Usage:
int roomArea = calculateArea(10, 20); // Returns 200