Section 1: Firewall Concept
- A firewall is a device (usually a router or a computer) installed between the internal network of an organization and the rest of the Internet
- It is designed to forward some packets and filter (not forward) others
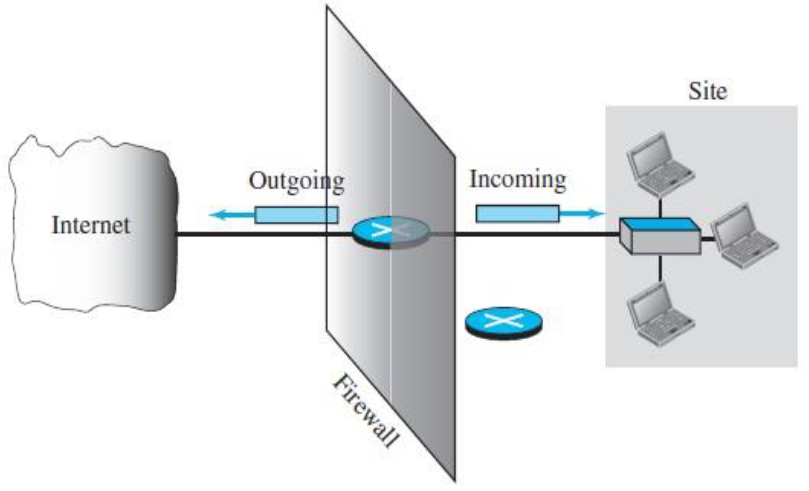
Think of a firewall like a security guard at a building entrance — they let authorized people in and stop unauthorized ones from entering.
1.1 Packet-Filter Firewall
- A firewall can be used as a packet filter
- It can forward or block packets based on information in the network-layer and transport-layer headers
- A packet-filter firewall is a router that uses a filter table to decide which packets must be discarded (not forwarded)
1.2 Filter Table Criteria
A filter table lists rules/policies to drop or accept packets according to the following criteria:
- The source or destination IP address or subnet
- The source or destination port (transport layer information)
- The type of protocol (TCP or UDP)
- The firewall's network interface
Like a bouncer checking a guest list — they look at who you are (IP), where you're going (port), and how you're getting in (protocol).
Section 2: Linux Firewall — Filter Table
2.1 The Three Chains
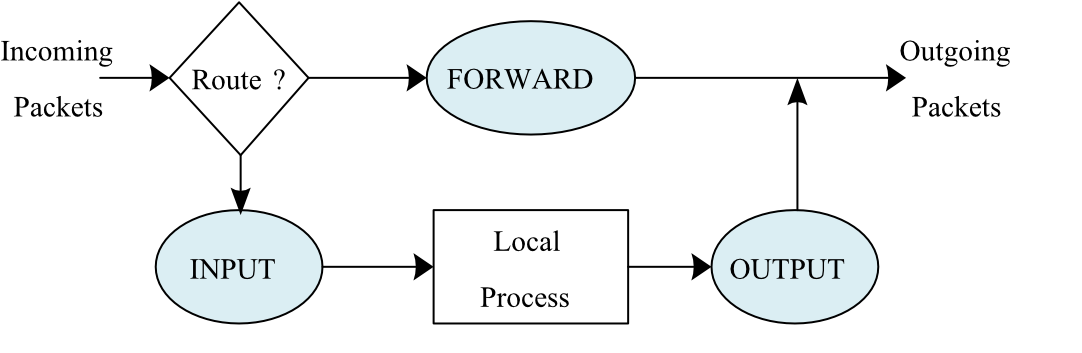
The filter table in a Linux computer (acting as a firewall) consists of 3 parts called chains. Each chain has firewall rules (policies):
- INPUT chain — An incoming packet sent to this computer will be checked (accepted or dropped) with the rules in the INPUT chain
- FORWARD chain — An incoming packet sent to another computer but relayed by this computer will be checked (accepted or dropped) with the rules in the FORWARD chain
- OUTPUT chain — A packet sent from this computer will be checked (accepted or dropped) with the rules in the OUTPUT chain
Imagine the computer is a post office:
- INPUT = mail addressed to the post office itself
- FORWARD = mail passing through the post office to somewhere else
- OUTPUT = mail sent out by the post office
2.2 Packet Flow Diagram
2.3 How Rules Are Checked
- The order of the rules matters
- In each chain, the packet will be checked rule by rule, from the first rule to the last rule
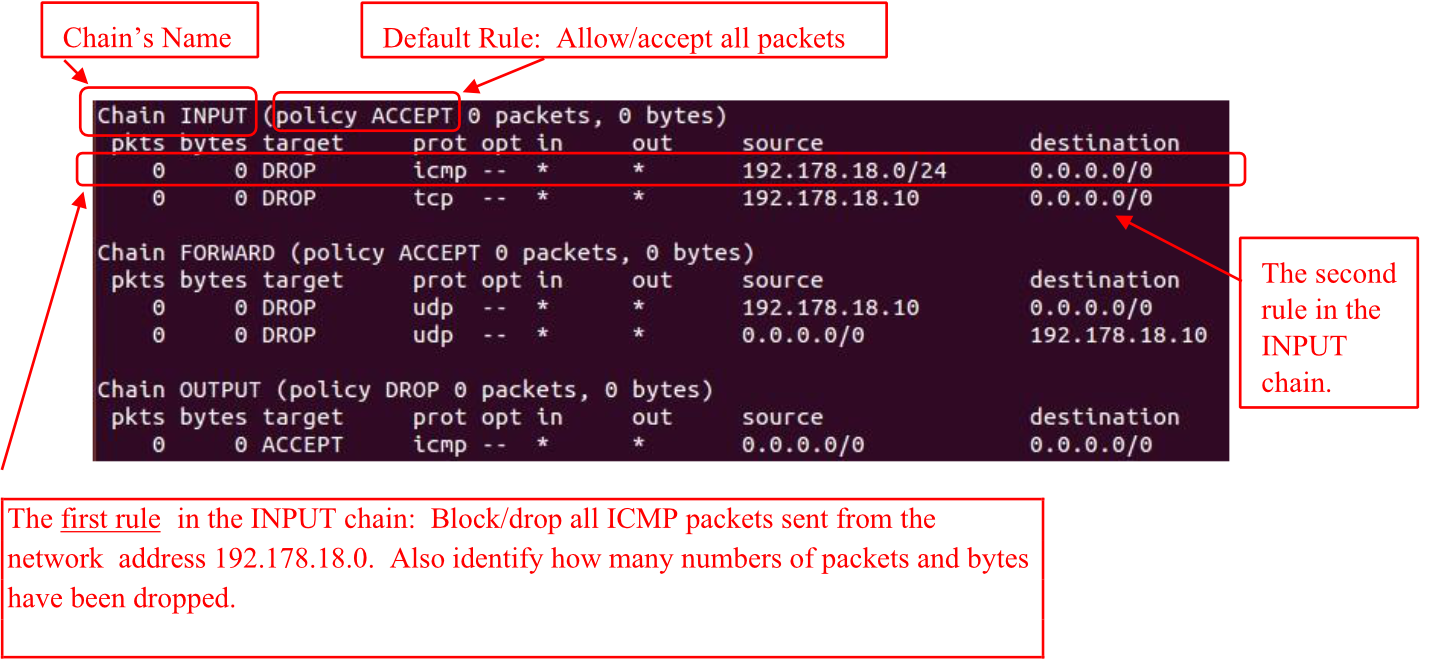
- Each chain has a Default Rule (policy) — either ACCEPT or DROP — which is applied if no specific rule matches
Example filter table:
| Chain | Rule | Protocol | Source | Destination | Action |
|---|---|---|---|---|---|
| INPUT | 1st | icmp | 192.178.18.0/24 | 0.0.0.0/0 | DROP |
| INPUT | 2nd | tcp | 192.178.18.10 | 0.0.0.0/0 | DROP |
| INPUT | Default | — | — | — | ACCEPT |
| FORWARD | 1st | udp | 192.178.18.10 | 0.0.0.0/0 | DROP |
| FORWARD | 2nd | udp | 0.0.0.0/0 | 192.178.18.10 | DROP |
| FORWARD | Default | — | — | — | ACCEPT |
| OUTPUT | 1st | icmp | 0.0.0.0/0 | 0.0.0.0/0 | ACCEPT |
| OUTPUT | Default | — | — | — | DROP |
Section 3: Linux Firewall Command — iptables
iptablesis the Linux command to reset, add, and delete firewall policies/rules in a filter table- Requires super-user privilege → must use
sudoin front of the command
3.1 Basic iptables Commands
| Command | Meaning |
|---|---|
sudo iptables -nvL | Show the filter table (-n: numeric format, -v: verbose, -L: list all chains) |
sudo iptables -F | Delete all existing firewall rules |
sudo iptables -P <chain> <ACCEPT|DROP> | Set the default rule for a chain (INPUT, OUTPUT, or FORWARD) |
sudo iptables-save > rule1.txt | Save current firewall rules to file rule1.txt |
sudo iptables-restore < rule1.txt | Restore firewall rules from file rule1.txt |
Examples:
sudo iptables -P INPUT ACCEPT→ by default, all incoming packets are acceptedsudo iptables -P OUTPUT DROP→ by default, all outgoing packets are droppedsudo iptables -P FORWARD ACCEPT→ by default, all relayed packets are accepted
3.2 Adding, Inserting, and Deleting Rules
Syntax:
sudo iptables <action-on-chain> <chain-name> <rule> <action-on-packet>Action on Chain
| Flag | Meaning |
|---|---|
-A | Append a new rule at the end of a chain |
-I <chain> <position> | Insert a rule at a specified position (e.g., -I INPUT 3 inserts at position 3); omitting position inserts at the beginning |
-D | Delete a rule |
-P | Reset the default rule |
Chain Names
| Flag | Chain |
|---|---|
INPUT | INPUT chain |
FORWARD | FORWARD chain |
OUTPUT | OUTPUT chain |
Rule Options
| Flag | Meaning |
|---|---|
-s <ip-address> | Check if packet is from this source IP (e.g., 192.168.18.5) |
-s <network-address> | Check if packet is from this source network (e.g., 192.168.34.0/24) |
-d <ip-address> | Check if packet is going to this destination IP |
-d <network-address> | Check if packet is going to this destination network |
-p <protocol> | Check protocol type: tcp, udp, icmp, etc. |
--sport <port> | Check source port (e.g., 21, 53, 80) |
--dport <port> | Check destination port |
-i <NIC> | Check if incoming packet enters through this interface (e.g., eth0, eth1) |
-o <NIC> | Check if outgoing packet exits through this interface |
Action on Packet
| Flag | Meaning |
|---|---|
-j ACCEPT | Accept this packet if the rule matches |
-j DROP | Drop this packet if the rule matches |
Think of
-jas "jump to action" — when a rule matches, jump to either ACCEPT or DROP.
Section 4: Firewall Strategies
There are two general firewall strategies:
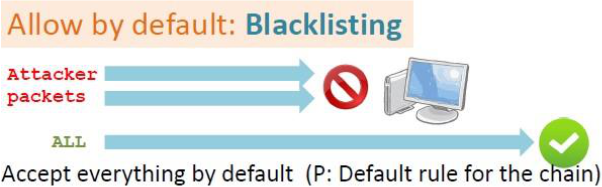
4.1 Blacklisting Strategy
- Default policy: ACCEPT
- Continuously insert rules to DROP malicious packets
- "Allow everything except the known bad"
Like allowing all guests into a party EXCEPT those on the banned list.
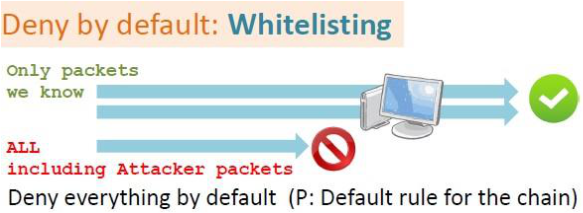
4.2 Whitelisting Strategy
- Default policy: DROP
- Continuously insert rules to ACCEPT good packets
- "Deny everything except the known good"
- More secure from a security standpoint — this strategy is more popular/better
Like only allowing guests who are on the approved guest list — everyone else is turned away.
| Strategy | Default Policy | Insert Rules to… | Security Level |
|---|---|---|---|
| Blacklisting | ACCEPT | DROP bad packets | Lower |
| Whitelisting | DROP | ACCEPT good packets | Higher ✅ |
Assignment 1: INPUT Chain — Blacklisting Strategy
Goal: Set up firewall rules in the INPUT chain using the blacklisting strategy
| Rule | Description |
|---|---|
| 1st Rule | DROP all ICMP packets from network 192.168.198.0/24 (change to your network) |
| 2nd Rule | DROP TCP packets from IP 35.197.141.103 (SIIT web server) |
| Default Rule | ACCEPT all other packets |
Check your network with:
ifconfig
Step-by-Step: Assignment 1
Step 1.1 — Reset firewall to default
sudo iptables -F INPUT
sudo iptables -P INPUT ACCEPT
sudo iptables -nvL
Step 1.2 — Test network connectivity (before setting rules)
- Ask a friend to
pingyour computer → should succeed (reachable) - Open
www.siit.tu.ac.thin browser → should load completely
Step 1.3 — Set up firewall rules
# Add 1st rule: Drop all ICMP from your subnet
sudo iptables -A INPUT -p icmp -s 192.168.198.0/24 -j DROP

# Add 2nd rule: Drop all TCP from SIIT web server
sudo iptables -A INPUT -p tcp -s 35.197.141.103 -j DROP

# Verify the filter table
sudo iptables -nvL
Step 1.4 — Test (verify rules work)
- (a) Ask friend to
pingyour computer → should FAIL (ICMP blocked) ✅ - (b) Open
www.siit.tu.ac.thin browser → should NOT load (TCP from SIIT blocked) ✅ - (c) Open
www.tu.ac.thin browser → should load successfully (default rule = ACCEPT) ✅
Assignment 2: INPUT Chain — Whitelisting Strategy
Goal: Set up firewall rules in the INPUT chain using the whitelisting strategy
| Rule | Description |
|---|---|
| 1st Rule | ACCEPT all ICMP packets from network 192.168.198.0/24 (change to your network) |
| Default Rule | DROP all other packets |
จะหา network ยังไง
route -n
Step-by-Step: Assignment 2
Step 2.1 — Reset firewall to default
sudo iptables -F INPUT
sudo iptables -P INPUT ACCEPT
sudo iptables -nvL
Step 2.2 — Test network connectivity (before setting rules)
- Open
www.tu.ac.thin browser → should load completely
Step 2.3 — Set up firewall rules
# Add 1st rule: Accept ICMP from your subnet
sudo iptables -A INPUT -p icmp -s 192.168.198.0/24 -j ACCEPT

# Set default rule to DROP (whitelisting)
sudo iptables -P INPUT DROP

# Verify
sudo iptables -nvL
Step 2.4 — Test (verify rules work)
- (a) Ask friend to
pingyour computer → should SUCCEED (ICMP accepted by 1st rule) ✅ - (b) Open
www.tu.ac.thin browser → should NOT load (dropped by default DROP rule) ✅
Assignment 3: OUTPUT Chain — Blacklisting Strategy
Goal: Set up firewall rules in the OUTPUT chain using the blacklisting strategy
| Rule | Description |
|---|---|
| 1st Rule | DROP all outgoing ICMP packets |
| 2nd Rule | DROP TCP packets going to www.pantip.com |
| Default Rule | ACCEPT all other packets |
Note: Using a domain name (
www.pantip.com) will automatically resolve to the server's IP addresses and fill them in the filter table.
Step-by-Step: Assignment 3
Step 3.1 — Reset firewall to default (both INPUT and OUTPUT)
sudo iptables -F INPUT
sudo iptables -P INPUT ACCEPT
sudo iptables -F OUTPUT
sudo iptables -P OUTPUT ACCEPT
sudo iptables -nvL
Step 3.2 — Test network connectivity (before setting rules)
- (a) Ping a friend's computer → should succeed
- (b) Open
www.pantip.comin browser → should load completely
Step 3.3 — Set up firewall rules
# Add 1st rule: Drop all outgoing ICMP
sudo iptables -A OUTPUT -p icmp -j DROP

# Add 2nd rule: Drop outgoing TCP to pantip.com
sudo iptables -A OUTPUT -p tcp -d www.pantip.com -j DROP

# Verify
sudo iptables -nvL
The system will automatically resolve
www.pantip.comto its IP addresses and add multiple DROP rules for each IP.
Step 3.4 — Test (verify rules work)
- (a) Ping friend's computer → should FAIL (outgoing ICMP blocked) ✅
- (b) Open
www.pantip.com→ should NOT load (TCP to pantip blocked) ✅ - (c) Open
www.tu.ac.th→ should load successfully (default rule = ACCEPT) ✅
Assignment 4: FORWARD Chain — Whitelisting Strategy (Group of 3)
Goal: Set up firewall rules in the FORWARD chain in Router R1 using the whitelisting strategy
Network Setup
Computer A          Router R1              Computer B
192.168.5.2/24  →  eth1: 192.168.5.3/24  →  192.128.10.10/24
                   eth2: 192.128.10.5/24
- Network A:
192.168.5.0/24 - Network B:
192.128.10.0/24
Useful Setup Commands
# On Computer A: add default gateway
route add default gw 192.168.5.3

# On Computer B: add default gateway
route add default gw 192.128.10.5

# On Router R1: enable IP forwarding
sysctl -w net.ipv4.ip_forward=1
iptables -P FORWARD ACCEPT
FORWARD Chain Rules
| Rule | Description |
|---|---|
| 1st Rule | ACCEPT UDP packets from Network A (192.168.5.0/24) |
| 2nd Rule | ACCEPT all ICMP packets |
| Default Rule | DROP all other packets |
Step-by-Step: Assignment 4
Step 4.1 — Network setup (refer to Lab 6 & Lab 7)
Step 4.2 — Reset FORWARD chain
sudo iptables -F FORWARD
sudo iptables -P FORWARD ACCEPT
sudo iptables -nvL
Step 4.3 — Test network connection
- Ping from Computer A to Computer B → should succeed
- Ping from Computer B to Computer A → should succeed
Step 4.4 — Set up firewall rules
# Add 1st rule: Accept UDP from Network A
sudo iptables -A FORWARD -p udp -s 192.168.5.0/24 -j ACCEPT

# Add 2nd rule: Accept all ICMP
sudo iptables -A FORWARD -p icmp -j ACCEPT

# Set default to DROP (whitelisting)
sudo iptables -P FORWARD DROP

# Verify
sudo iptables -nvL
Step 4.5 — Test (verify rules work)
(a) Verify 1st rule — UDP from A to B
# On Computer B (server):
nc -luvn 5000         # Ubuntu
nc -luv -p 5000       # IMUNES

# On Computer A (client):
nc -uvn 192.128.10.10 5000- Type
Test+ Enter at Computer A → message appears at Computer B ✅ - Type
Pass+ Enter at Computer B → message does NOT appear at Computer A (B→A UDP is blocked) ✅
(b) Verify 2nd rule — ICMP
- Ping Computer A ↔ Computer B → should succeed (ICMP is accepted) ✅
(c) Verify default rule — TCP blocked
# On Computer B (server):
nc -lvn 5000          # Ubuntu
nc -lv -p 5000        # IMUNES

# On Computer A (client):
nc -vn 192.128.10.10 5000- Type
Test+ Enter at Computer B → message does NOT appear at Computer A (TCP is dropped) ✅
Assignment 5: Full Internetwork with Firewall (Group of 4)
Network Topology
Network A          Network C          Network B
192.16.10.0/24  →  192.20.20.0/24  →  192.40.30.0/24
          R1                    R2
- Computer A: in Network A
- Computer B: in Network B
- Router R1: connects Network A ↔ Network C
- Router R2: connects Network C ↔ Network B
Step 5.1 — Physical Network Diagram
(Draw physical diagram here — assign all IP addresses for each interface)
Step 5.2 — Firewall Rules Summary
Computer A
| Chain | Rule |
|---|---|
| INPUT | Default: ACCEPT all |
| FORWARD | Default: ACCEPT all |
| OUTPUT | 1st: DROP ICMP to Network C; Default: ACCEPT all |
Router R1
| Chain | Rule |
|---|---|
| INPUT | Default: ACCEPT all |
| FORWARD | Default: ACCEPT all |
| OUTPUT | Default: ACCEPT all |
Router R2
| Chain | Rule |
|---|---|
| INPUT | Default: ACCEPT all |
| FORWARD | Default: ACCEPT all |
| OUTPUT | 1st: ACCEPT TCP; 2nd: ACCEPT ICMP; Default: DROP all |
Computer B
| Chain | Rule |
|---|---|
| INPUT | Default: ACCEPT all |
| FORWARD | Default: ACCEPT all |
| OUTPUT | Default: ACCEPT all |
Step 5.2 Commands
# Computer A — OUTPUT chain
sudo iptables -F OUTPUT
sudo iptables -A OUTPUT -p icmp -d 192.20.20.0/24 -j DROP
sudo iptables -P OUTPUT ACCEPT

# Router R2 — OUTPUT chain (whitelisting)
sudo iptables -F OUTPUT
sudo iptables -A OUTPUT -p tcp -j ACCEPT
sudo iptables -A OUTPUT -p icmp -j ACCEPT
sudo iptables -P OUTPUT DROP
Step 5.3 — Questions (Trace Packet Flow)
| Question | Answer |
|---|---|
| a) Can Computer A ping Router R1 (Network A IP)? | Yes |
| b) Can Computer A ping Computer B? | Yes |
| c) Can Computer B ping Router R1 (Network A IP)? | Yes |
| d) Can Computer A send UDP packets to Computer B? | Yes |
| e) Can Computer B send TCP packets to Computer A? | Yes |
Quick Reference: Common iptables Commands
# View current filter table (verbose, numeric)
sudo iptables -nvL

# Flush (clear) all rules in a specific chain
sudo iptables -F INPUT
sudo iptables -F OUTPUT
sudo iptables -F FORWARD

# Set default policy
sudo iptables -P INPUT ACCEPT
sudo iptables -P INPUT DROP
sudo iptables -P OUTPUT DROP

# Append a rule
sudo iptables -A INPUT -p icmp -s 192.168.1.0/24 -j DROP
sudo iptables -A OUTPUT -p tcp -d www.example.com -j DROP

# Insert a rule at position 1 (beginning)
sudo iptables -I INPUT 1 -p tcp --dport 80 -j ACCEPT

# Delete a rule
sudo iptables -D INPUT 1

# Save and restore
sudo iptables-save > backup.txt
sudo iptables-restore < backup.txt
Quiz Preparation
Likely Quiz Topics
Conceptual Questions:
- What is the difference between blacklisting and whitelisting strategies? Which is more secure?
- What are the three chains in the Linux filter table? When is each chain used?
- In what order are firewall rules checked?
- What happens if no rule matches a packet?
- What is the difference between
-A(append) and-I(insert)?
Command Interpretation Questions: Given a command, identify what it does:
sudo iptables -A INPUT -p tcp -s 10.0.0.0/8 --dport 22 -j DROP→ Drop all TCP packets from 10.0.0.0/8 network destined for port 22 (SSH) on this computer
Scenario / Trace Questions: Given a filter table, determine if a packet is accepted or dropped:
Remember: rules are checked top to bottom; the first matching rule wins. If no rule matches, the default policy applies.
Short Answer / Explanation:
- Explain why the whitelisting strategy is more secure than blacklisting
- Explain the difference between INPUT and FORWARD chains
- What does
sudo iptables -Fdo? Is it dangerous? - If you accidentally DROP yourself out of an SSH session, what happens?
Key Facts to Remember
- Blacklisting = default ACCEPT, add DROP rules
- Whitelisting = default DROP, add ACCEPT rules
-j ACCEPT= accept the packet;-j DROP= silently discard the packet-s= source;-d= destination;-p= protocol--sport= source port;--dport= destination port-i= incoming interface;-o= outgoing interface- Rule order matters — first match wins
sudo iptables -P INPUT DROPcan lock you out of SSH if you're not careful!