#Summarized
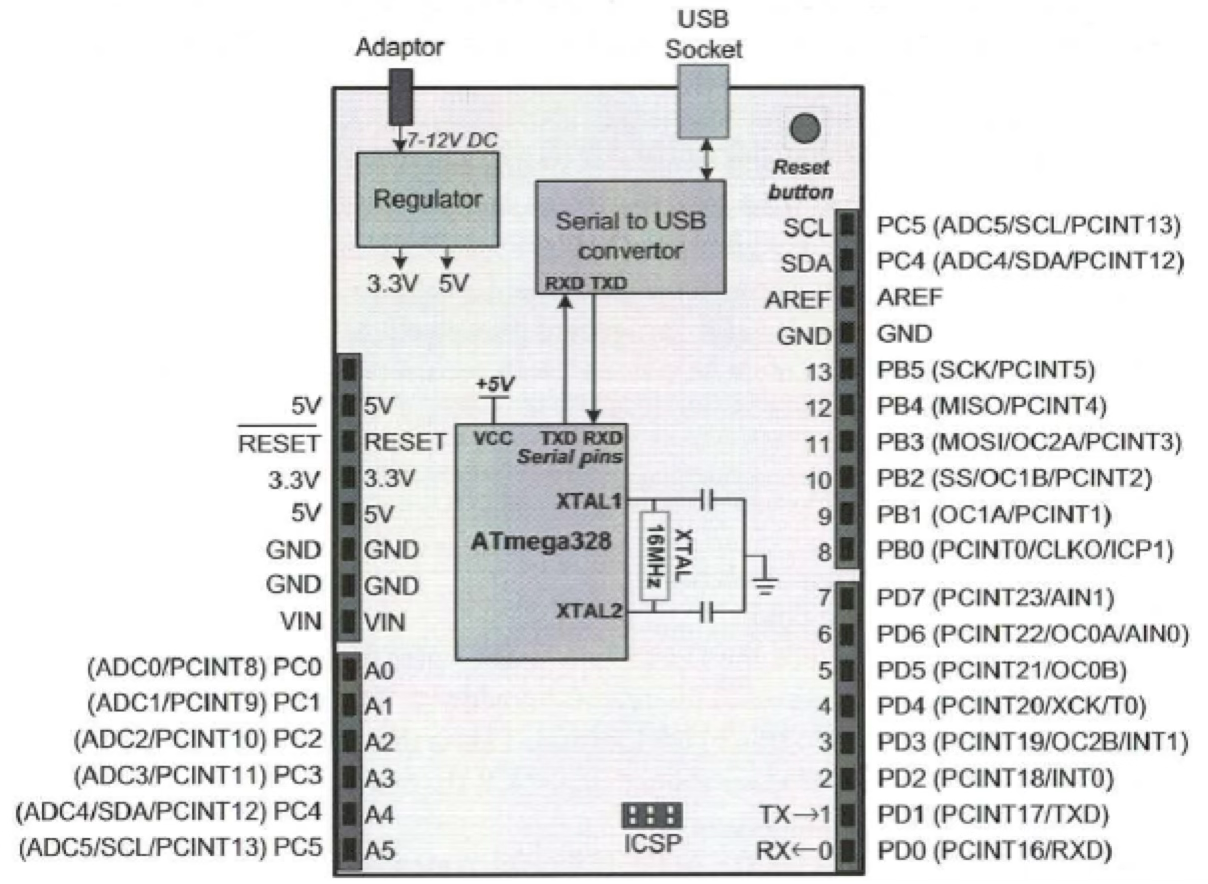
Introduction to C Programming
Basic C Program Structure
C programs follow a specific structure that's case-sensitive (all C instructions must be in lowercase).
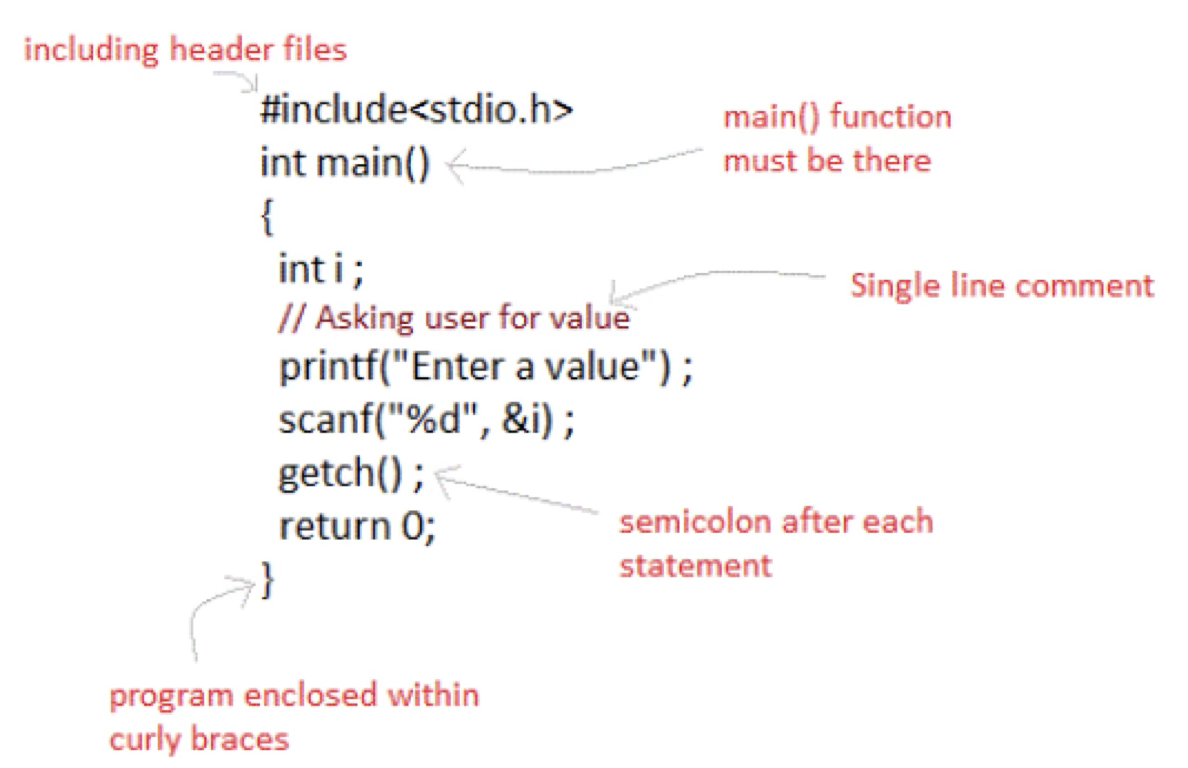
- Pre-processor Directives:
#includestatements link your program with necessary header files- Similar to Swift's
importstatements for frameworks - Example:
#include <stdio.h>includes standard input/output functions
- Header Files:
- Collections of pre-built functions you can use in your program
- All header files have
.hextension - Like Swift frameworks that provide ready-to-use functionality
- main() Function:
- Required in every C program
- All executable code goes inside this function
- Return type is typically
int - Similar to
@mainattribute in Swift for app entry point
- Return Statement:
return 0;marks the end of a C program- Indicates successful program execution
- Comments:
- Single-line comments begin with
// - Just like in Swift
- Single-line comments begin with
- Statement Terminator:
- Each statement must end with a semicolon (
;)
- Each statement must end with a semicolon (
C Keywords
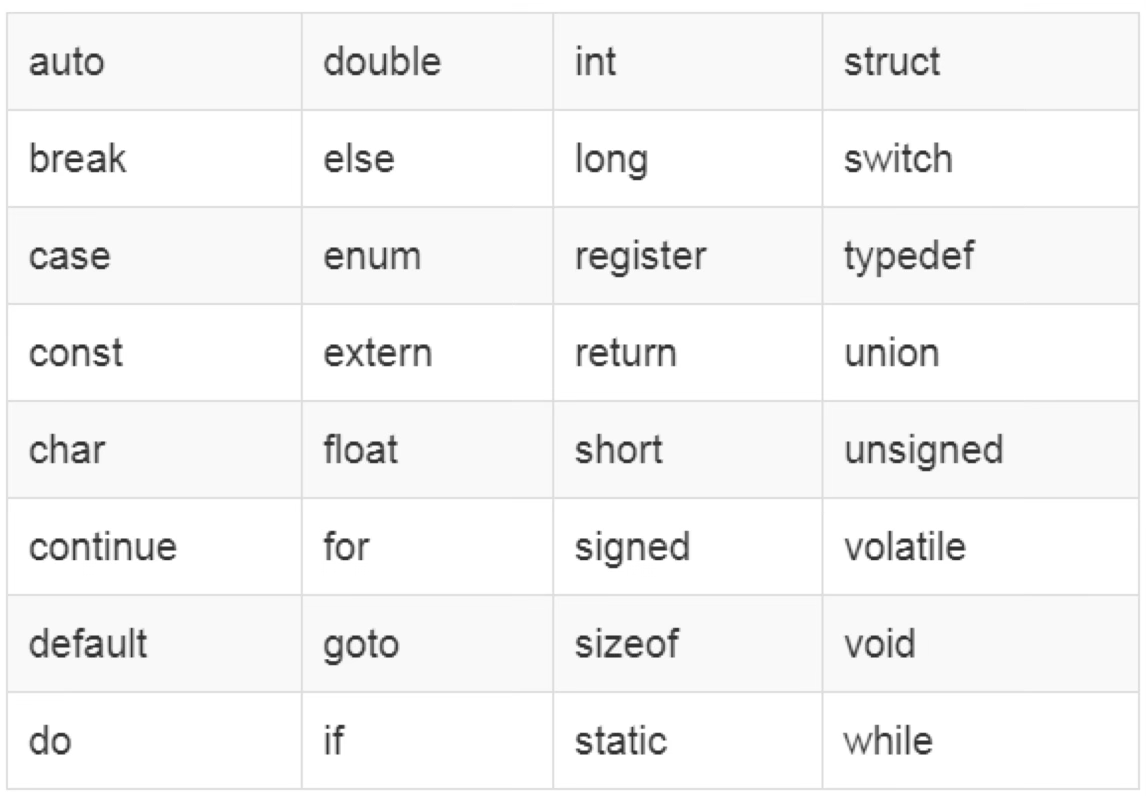
Keywords are reserved words with special meaning in C. They cannot be used as variable names. There are 32 keywords in C language.
Identifiers in C
Identifiers are names given to variables, constants, functions, and user-defined data.
Rules for Identifiers:
- Can only contain alphanumeric characters (a-z, A-Z, 0-9) and underscore _
- First character must be a letter or underscore
- Case-sensitive (similar to Swift)
- Cannot use keywords as identifiers
- No special characters allowed
C Operators
C has various operators for mathematical and logical operations. These are organized into categories:
Arithmetic Operators:
| Operator | Description | Example |
|---|---|---|
| + | Addition | c = a + b; |
| - | Subtraction | c = a - b; |
| * | Multiplication | c = a * b; |
| / | Division | c = a / b; |
| % | Modulus (remainder) | c = a % b; |
| ++ | Increment by 1 | c = a++; |
| -- | Decrement by 1 | c = a--; |
Relational Operators:
| Operator | Description | Example |
|---|---|---|
| == | Equal to | a == b |
| != | Not equal to | a != b |
| > | Greater than | a > b |
| < | Less than | a < b |
| >= | Greater than or equal to | a >= b |
| <= | Less than or equal to | a <= b |
Logical Operators:
| Operator | Description | Example |
|---|---|---|
| && | Logical AND | (a > 2) && (b < 10) |
| | | Logical OR | (a > 2) | (b < 10) |
| ! | Logical NOT | !(a > 2) |
Bitwise Operators:
- A=0b01110010, B=0b11001010
- use often in AVR programing in C
| Operator | Description | Example | Result |
|---|---|---|---|
| & | Bitwise AND | A & B | 0b01000010 |
| | | Bitwise OR | A | B | 0b11111010 |
| ^ | Bitwise XOR | A ^ B | 0b10111000 |
| ~ | Bitwise NOT | ~A | 0b10001101 |
| << | Left shift | A << 2 | 0b11001000 |
| >> | Right shift | A >> 2 | 0b00011100 |
Assignment Operators:
Arithmetic Assignment:
| Operator | Description | Example |
|---|---|---|
| = | Simple assignment | a = b; |
| += | Add and assign | a += b; (same as a = a + b;) |
| -= | Subtract and assign | a -= b; (same as a = a - b;) |
| *= | Multiply and assign | a *= b; (same as a = a * b;) |
| /= | Divide and assign | a /= b; (same as a = a / b;) |
| %= | Modulus and assign | a %= b; (same as a = a % b;) |
Logic Assignment:
| Operator | Description | Example |
|---|---|---|
| &= | AND and assign | A &= B; (same as A = A & B;) |
| |= | OR and assign | A |= B; (same as A = A | B;) |
| ^= | XOR and assign | A ^= B; (same as A = A ^ B;) |
Data Types in C
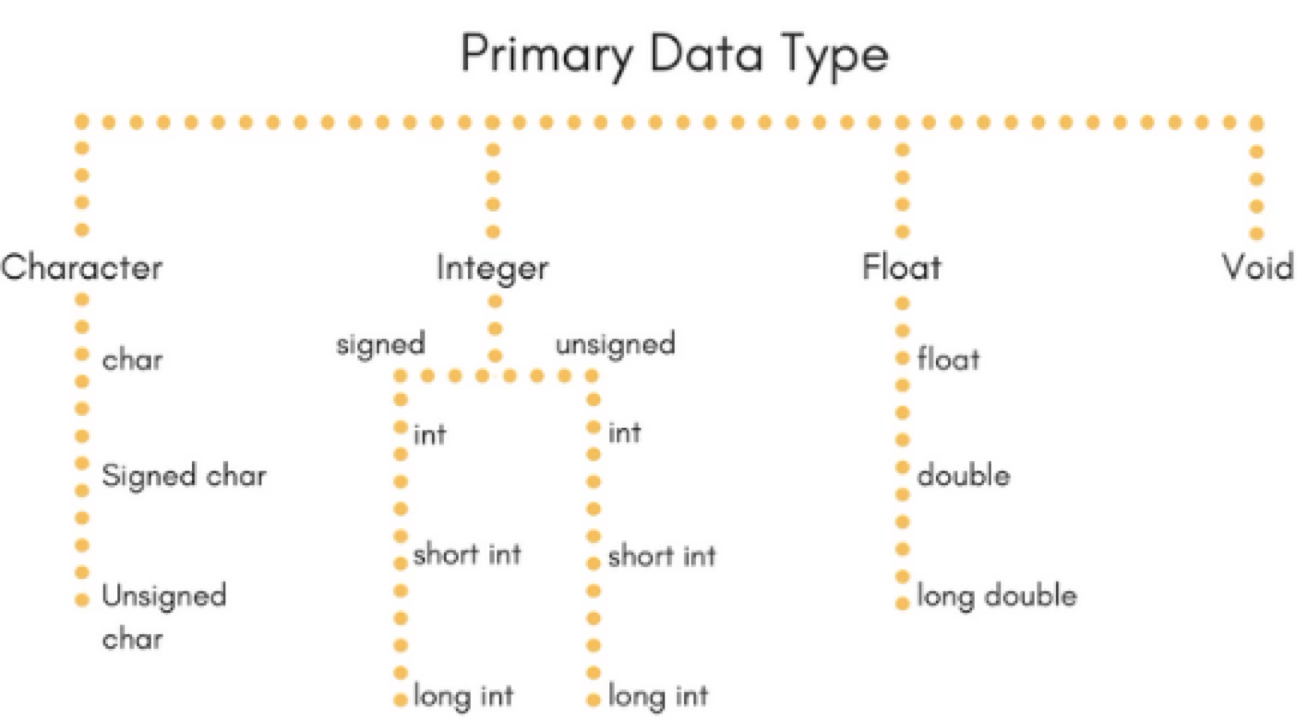
The data type determines what kind of values a variable can store. In C, every variable must be declared before use.
Integer Data Types
Variables of this type store whole numbers (no decimals). For example:
int x;
unsigned int y;| Data Type | Size in Bytes | Data Range |
|---|---|---|
| int or signed int | 2 | -32,768 to 32,767 |
| unsigned int | 2 (16 bits) | 0 to 65,535 () |
| short int or signed short int | 1 | -128 to 127 |
| unsigned short int | 1 | 0 to 255 |
| long int or signed long int | 4 | -2,147,483,648 to 2,147,483,647 |
| unsigned long int | 4 | 0 to 4,294,967,295 |
Floating Point Data Types
- These store numbers with decimal points (real numbers). For example:
float x;
long double y;| Data Type | Size in Bytes | Data Range |
|---|---|---|
| float | 4 | 3.4E-38 to 3.4E+38 |
| double | 8 | 1.7E-308 to 1.7E+308 |
| long double | 10 | 3.4E-4932 to 1.1E+4932 |
Character Data Types
- These store a single character or small number. For example:
char x;
unsigned char y;| Data Type | Size in Bytes | Data Range |
|---|---|---|
| char or signed char | 1 | -128 to 127 |
| unsigned char | 1 | 0 to 255 |
Void Data Type
This indicates "no value" and is typically used for functions that don't return anything:
void MyFunc() {
    a = b + 1;
}
Decision Making in C
- Decision making allows the program to execute different code based on conditions.
- The most common form is the
if...elsestatement:
// Syntax
if (condition1) {
    statement block1;
} else if (condition2) {
    statement block2;
} else if (condition3) {
    statement block3;
} else {
    default statements;
}
// Example
#include <stdio.h>
void main() {
int a = 2;
if (a == 1) {
printf("A is small");
} else if (a == 2) {
printf("A is medium");
} else {
printf("A is large");
}
}Loops in C
Loops allow you to execute a block of code multiple times. C has three main types of loops:
While Loop
The while loop checks a condition first, then executes the code if the condition is true:
// Syntax
while (condition) {
    a set of statements;
}
// Example
#include <stdio.h>
void main() {
int x = 1;
while (x <= 10) {
printf("%d\t", x);
x++;
}
}For Loop
- The for loop combines initialization, condition checking, and increment/decrement in one statement:
- Variable initialization (e.g.,
x = 0;) - Condition (e.g.
while (x <= 10)) – repeat the loop when the condition is true. - Variable increment or decrement (
x++orx--orx = x + 2)
- Variable initialization (e.g.,
// Syntax
for (initialization; condition; increment/decrement) {
    a set of statements;
}
// Example
#include <stdio.h>
void main() {
int x;
for (x = 1; x <= 10; x++) {
printf("%d\t", x);
}
}Do-While Loop
The do-while loop executes the code block first, then checks the condition:
// Syntax
do {
    a set of statements;
} while (condition);
// Example
#include <stdio.h>
void main() {
int a, i;
a = 5;
i = 1;
do {
printf("%d\t", a*i);
i++;
} while (i <= 10);
}Important: The do-while loop always executes at least once, even if the condition is initially false!
Basic C Commands in AVR Programming
AVR Programming in C
AVR-Specific Headers
#include <avr/io.h>
With this header file, all the AVR registers are automatically recognized in your code:
- You can use them directly without declaration (DDRB, PINC, PORTD, TCNT0, etc.)
- This is similar to how importing UIKit in Swift gives you immediate access to all UI components
I/O Pin Programming
With #include <avr/io.h>, you can access the three key I/O registers
for each port (B, C, D):
- DDRx: Data Direction Register (configures pins as input or output)
- PINx: Input register (reads values from pins)
- PORTx: Output register (sends values to pins)
Where x is B, C, or D (depending on which port you're working with).
Setting Pins as Inputs
DDRB = 0x00;   // All pins in Port B are inputs
PORTB = 0xFF;  // Enable pull-up resistors
After this configuration, PINB will contain the data read from Port B pins.
Setting Pins as Outputs
DDRB = 0xFF; // All pins in Port B are outputsAfter this configuration, data written to PORTB will be sent to the physical pins.
- Setting or reading the values of these registers follows the C programming rule (similar to other high-level programming languages).
Example: Reading and Writing I/O
This program reads values from Port B (configured as inputs) and sends them to Port D (configured as outputs):
#include <avr/io.h>

int main(void) {
    DDRB = 0x00;  // Port B pins as inputs
    PORTB = 0xFF; // Enable pull-up resistors
    DDRD = 0xFF;  // Port D pins as outputs

    while(1) {    // Infinite loop
        PORTD = PINB;  // Read from B, write to D
    }
    return 0;
}
Time Delay Functions
To create precise time delays, you need two components:
#define F_CPU 16000000UL  // Define CPU frequency (16 MHz for Arduino UNO)
#include <util/delay.h>   // Include delay functions
- Important: You must define
F_CPUbefore including the delay header! - After including these, you can use two key functions:
| Command | Explanation |
|---|---|
_delay_us(x); | Delay for x microseconds |
_delay_ms(x); | Delay for x milliseconds |
Example: Time Delay (Creating a 1-Second Blink)
The following C program will toggle (on/off) the pins D every 1 second.
#define F_CPU 16000000UL
#include <util/delay.h>
#include <avr/io.h>

int main(void) {
    DDRD = 0xFF;  // Port D as output

    while(1) {
        PORTD = 0xFF;      // Turn all LEDs on
        _delay_ms(1000);   // Wait 1 second
        PORTD = 0x00;      // Turn all LEDs off
        _delay_ms(1000);   // Wait 1 second
    }
    return 0;
}- อันนี้แค่ On/Off LED for 1 second.
Data Serialization in C
- Serialization means sending data one bit at a time through a single pin. Bit-shifting operators are essential for this:

| Command | Meaning | Result (binary) |
|---|---|---|
0b00010000>>3 | Shift right 3 times | 0b00000010 |
0xF1<<1 | Shift left 1 time | 0b11100010 |
8>>4 | Shift right 4 times | 0b00000000 |
Bit Manipulation in C
When working with AVR microcontrollers, you often need to modify just a single bit in a register. C provides efficient ways to do this:
Setting a Single Bit (Make it 1)
PORTB |= (1 << n) // Sets bit n of PORTB to 1Clearing a Single Bit (Make it 0)
PORTB &= ~(1 << n) // Clears bit n of PORTB to 0Toggling a Single Bit (Flip it)
PORTB ^= (1 << n) // Toggles bit n of PORTBWhere n is the bit position (0-7) you want to manipulate.
อันนี้หมายถึงว่าอยากเปลี่ยนแค่ Bit เดียวใน C มันต้องทำถึง 3 ขั้นตอนเลยนะ เยอะมาก555 อยาก Manipulate Bit 3 ก็ให้
n = 3—nคือที่ Bit that you want to do~
Example: Single Bit Manipulation
This program configures PB5 as an input and PC7 as an output, then reads from PB5 and controls PC7 accordingly:
#include <avr/io.h>

int main(void) {
    DDRD &= ~(1<<5);  // Configure bit 5 of Port B as input
    DDRC |= (1<<7);   // Configure bit 7 of Port C as output

    while(1) {
        if(PINB & (1<<5))
            PORTC |= (1<<7);    // If PB5 is high, set PC7 high
        else
            PORTC &= ~(1<<7);   // If PB5 is low, set PC7 low
    }
    return 0;
}AVR Timer Programming in C
Timer Programming in C
- AVR microcontrollers have powerful built-in timer/counter modules that can be programmed for various timing applications.
Key Timer0 Registers
- TCNT0: Timer/Counter Register (holds the actual count value)
- TCCR0A/TCCR0B: Timer/Counter Control Registers (configure the timer's mode)
- OCR0A/OCR0B: Output Compare Registers (used for compare modes)
- TIFR0: Timer Interrupt Flag Register (contains status flags)
Important Timer Flags
- TOV0: Timer Overflow Flag (set when timer overflows)
- OCF0A/OCF0B: Output Compare Match Flags (set when timer matches OCR values)
Example: Normal Mode with no Pre-scaling Frequency
The following program will toggle the bits of PORTB with some delay by
using Timer0. Assume the crystal frequency is 16MHz.
#include <avr/io.h>

void T0Delay();
int main() {
	DDRB = 0xFF;

	while(1) {
		PORTB = 0x55;
		T0Delay();
		PORTB = 0xAA;
		T0Delay();
	}
}
Example: Using Timer0 in C
void T0Delay() {
	TCNT0 = 0x20; // load TCNT0
	TCCR0A = 0;
	TCCR0B = 0x01;
	// Timer0, Normal Mode, No prescaler
	while((TIFR0 & (1<<TOV0)) == 0);
	// wait for Timer0 to roll over
	TCCR0B = 0;
	TIFR0 = 1<<TOV0; // Clear TOV0
}
Computing Time Delay
In C programming for AVR, time delays are calculated by:
- Number of clock pulses = 1 + 0xFF - 0x20 = 224 pulses
- Delay = Number of pulses × Clock period
- The clock-pulse time duration =
- The time delay is equal to
AVR Interrupt Programming in C
Steps of Interrupt Programming in C
- Include the interrupt header file:
#include <avr/interrupt.h> - Enable specific interrupt flag(s):
- For Timer0 interrupt: Set TOIE0 in TIMSK0 register
- For external interrupt INT0: Set INT0 in EIMSK register
- Enable/disable global interrupts:
- Enable all interrupts:
sei(); - Disable all interrupts:
cli();
- Enable all interrupts:
- Define Interrupt Service Routine (ISR):
ISR(interrupt_vector_name) {
    // Code to execute when interrupt occurs
}
- When the interrupt happens, the microcontroller will go to execute the ISR.
- The ISR consists of a set of commands to do a task(s) when the interrupt happens.
- Defining the ISR in C is shown in the next page.
Define the interrupt service routine (ISR) in C
-
The ISR has the following structure.
ISR(interrupt vector name) { // our program } -
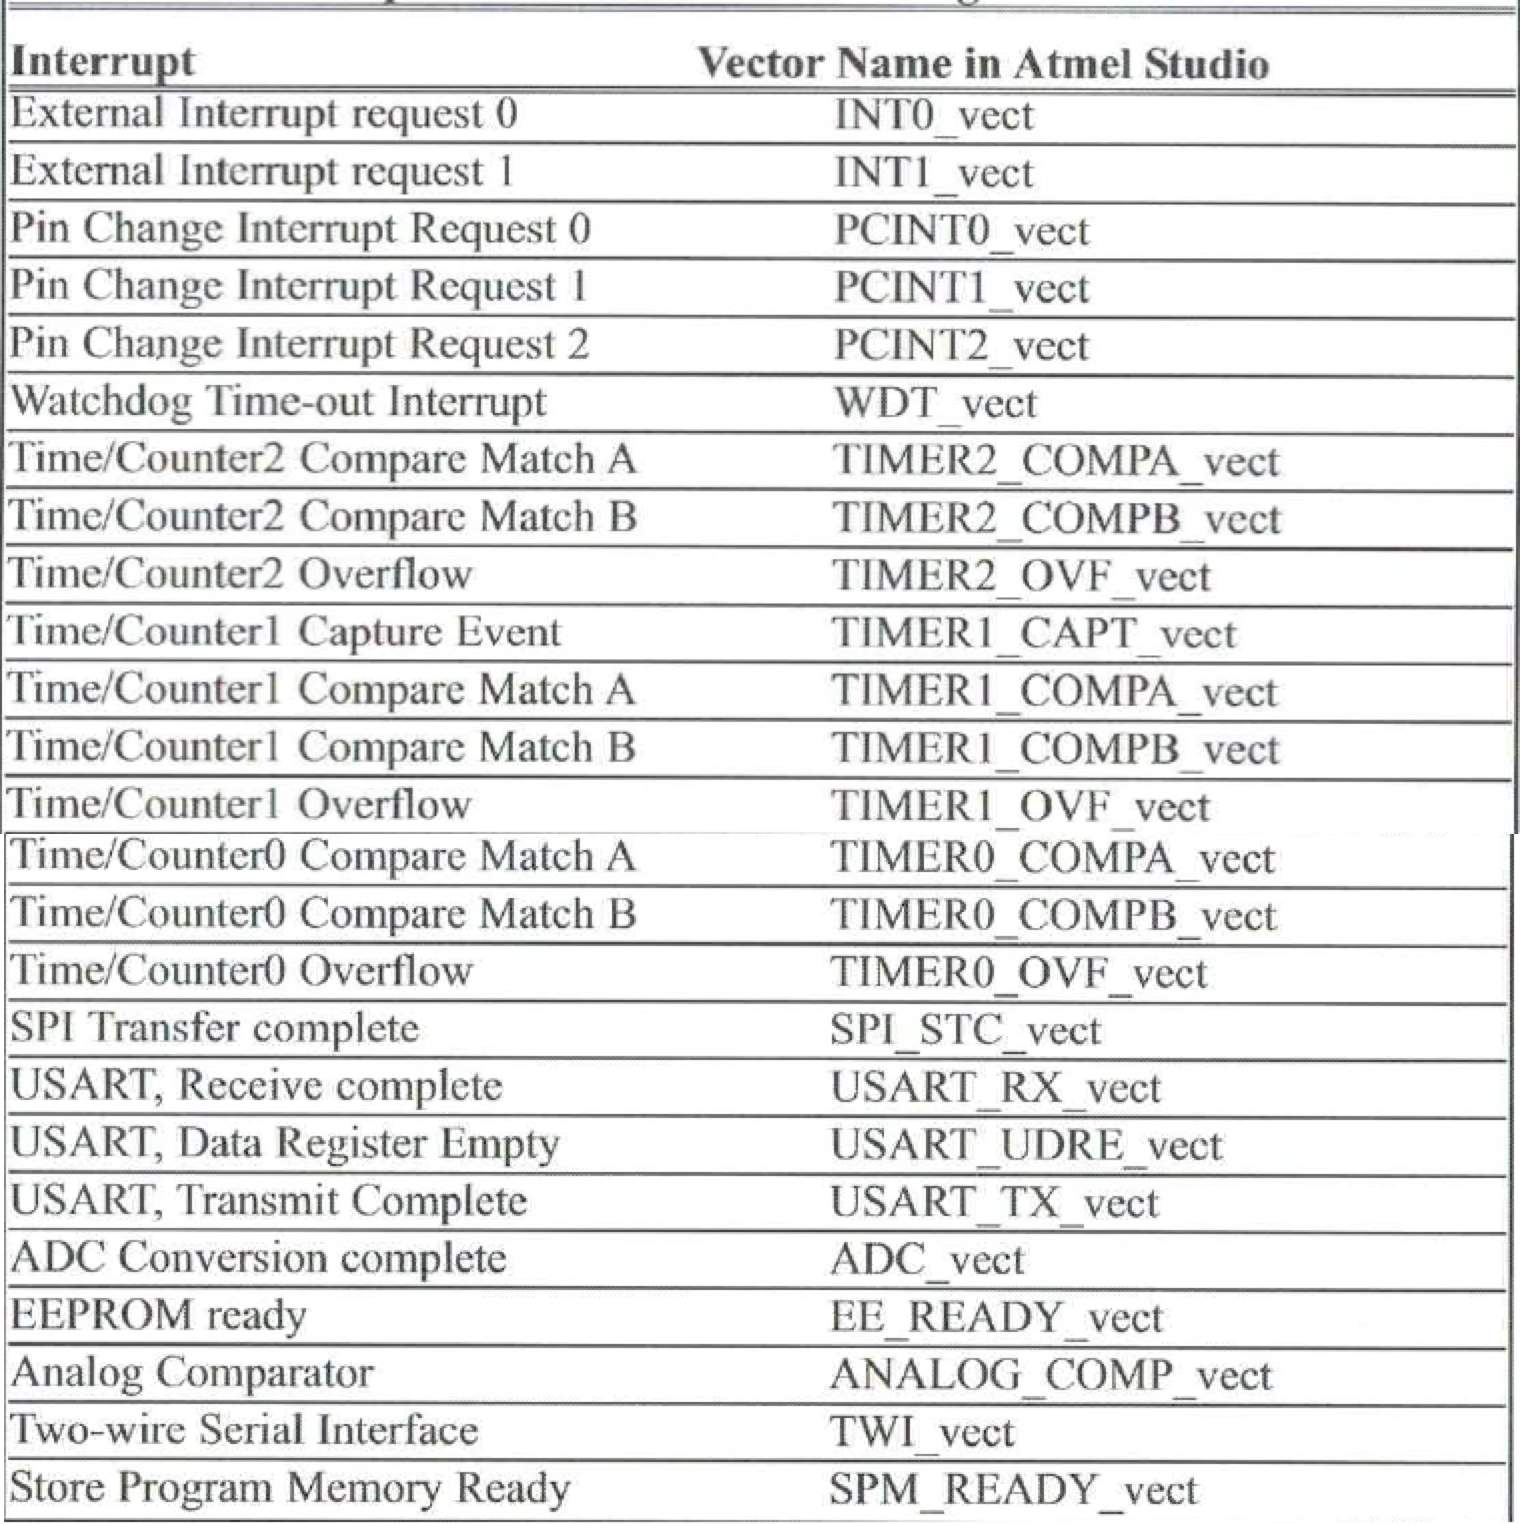
The term interrupt vector name specifies the interrupt vector name (shown in the table on the next two pages, right-hand side); when this interrupt happens, the commands in this ISR will be executed.
-
For example, here is the ISR of TIMER0_OVF_vect; when the Timer0 overflow happens (i.e., TOV = 1), the microcontroller will execute this ISR.
ISR  (TIMER0_OVF_vect) {
	//our C commands;
}
A List of Interrupt Vector Names
Example: Using Timer0 Interrupt
This program uses Timer0 to toggle pin PB5 every 2μs via interrupt, while simultaneously copying data from Port C to Port D in the main loop:
#include <avr/io.h>
#include <avr/interrupt.h>

ISR(TIMER0_OVF_vect) {    // ISR for Timer0 overflow
    TCNT0 = -32;          // Reload timer for next 2μs
    PORTB ^= (1<<5);      // Toggle pin PB5
}

int main() {
    DDRB |= (1<<5);       // Set PB5 as output

    TCNT0 = -32;          // Initial timer value for 2μs
    TCCR0A = 0x00;        // Normal mode
    TCCR0B = 0x01;        // No prescaler

    TIMSK0 = (1<<TOIE0);  // Enable Timer0 overflow interrupt
    sei();                // Enable global interrupts

    DDRC = 0x00;          // Set Port C as input
    PORTC = 0xFF;         // Enable pull-up resistors
    DDRD = 0xFF;          // Set Port D as output

    while(1) {            // Main loop
        PORTD = PINC;     // Copy Port C inputs to Port D outputs
    }
}
📄 Lab 8 - 02 Timer Interrupt.pdf
Example: Using the External Interrupt INT0
This program toggles pin PB5 whenever the INT0 pin (PD2) detects a falling edge (e.g., when a button is pressed), concurrently, the main task of this program is to repeat the while loop.:
#include <avr/io.h>
#include <avr/interrupt.h>

int main() {
    DDRB = 1<<5;          // Set PB5 as output
    PORTD = 1<<2;         // Enable pull-up on PD2 (INT0 pin)
    EICRA = 0x2;          // Configure INT0 for falling edge

    EIMSK = (1<<INT0);    // Enable external interrupt INT0
    sei();                // Enable global interrupts

    while(1);             // Wait here (main loop does nothing)
}

ISR(INT0_vect) {          // ISR for external interrupt INT0
    PORTB ^= (1<<5);      // Toggle PB5
}
📄 Lab 8 - 03 External Interrupt.pdf
Pin change ก็แค่เปลี่ยน
INT0_vectเป็นPCINT0_vect— ในภาษา C แค่ชื่อของ Interrupt เท่านั้นนะ ที่สำคัญ แต่ถ้าเป็นใน Assembly เป็น Address